

Contents:
Since the launch of ARKit in 2017, MobiDev has been actively involved in the field of augmented reality, and in 2018, we expanded our expertise into artificial intelligence to better serve our customers’ business needs. Harnessing the synergy of these two domains empowers us to design effective solutions for complex tasks, including indoor navigation.
The guide is not another exciting review of the potential of AR navigation, however. Instead, we will share with you the real possibilities of this technology, implementation challenges, and ways to overcome them. Please keep in mind that this is not an off-the-shelf solution, but is instead a guide to our approach and expertise related to building indoor navigation apps that can become the basis for your custom AR navigation system.
AR Navigation: How It Works
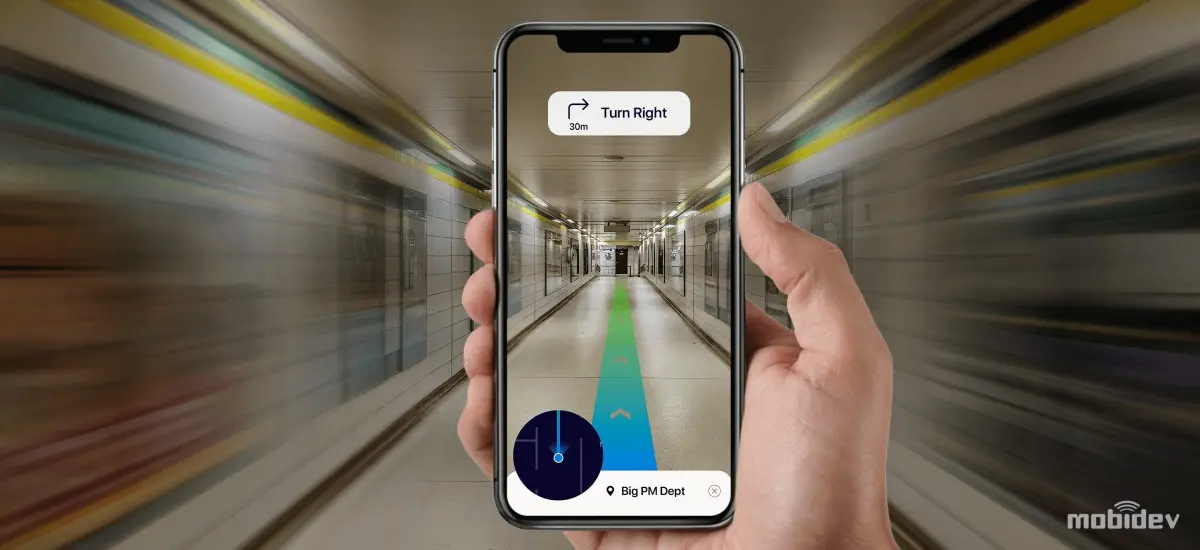
Augmented reality navigation is an innovative solution that combines real-time positioning with virtual data overlay for improved navigation experiences. The primary goal of this technology is to provide directions to users onscreen, overlaid on top of real environments seen through the camera of a device like a smartphone or headset. This alleviates the challenge of comparing the real world against a reference like a map, which is more difficult for users to use while navigating.
The indoor navigation system operates through a three-stage process:
- indoor positioning (localization) – determination of the user’s current coordinates
- navigation – laying a route from point A to point B
- rendering – generation of AR objects on top of the real environment
The last two steps are actually the easiest part of the whole process, and the most difficult element is determining the user’s position.
You can find an example of how AR navigation works in our demo below. This solution was built with ARCore.
A similar AR navigation app can be built using ARKit. Relying on the power of localization anchors and LiDAR sensor ARKit can make navigation easier due to its superior depth-sensing capabilities. Check out our demo to see how ARKit-based AR navigation can be implemented.
Regardless of what platform you choose, remember that they primarily differ in their capability to render and display AR directions. The navigation data and routing information can be handled exactly the same across both platforms.
Overview Of Indoor Positioning Technologies
When it comes to indoor positioning, we have several technological options with their own pros and cons, including the obvious but not sufficient GPS, followed by beacons, a visual positioning system (VPS), and visual markers. Let’s consider them in more detail.
WHY GPS IS NOT ENOUGH FOR INDOOR POSITIONING APP DEVELOPMENT
GPS is great if you need to show something on a large scale. For example, showing a supermarket building in augmented reality. In this case, even if the AR object is located 50 meters away, it will still be fine at this scale. However, this is not the case for indoor navigation where such accuracy is not satisfactory.
If we need to determine someone’s position inside a building or in an exact position in a dense downtown area, GPS can only do so much to support AR navigation. For example, it can only define a building and preload data for refining positioning using other technologies.
That leaves three other options for indoor navigation: beacons, visual positioning systems (VPS), and visual markers.
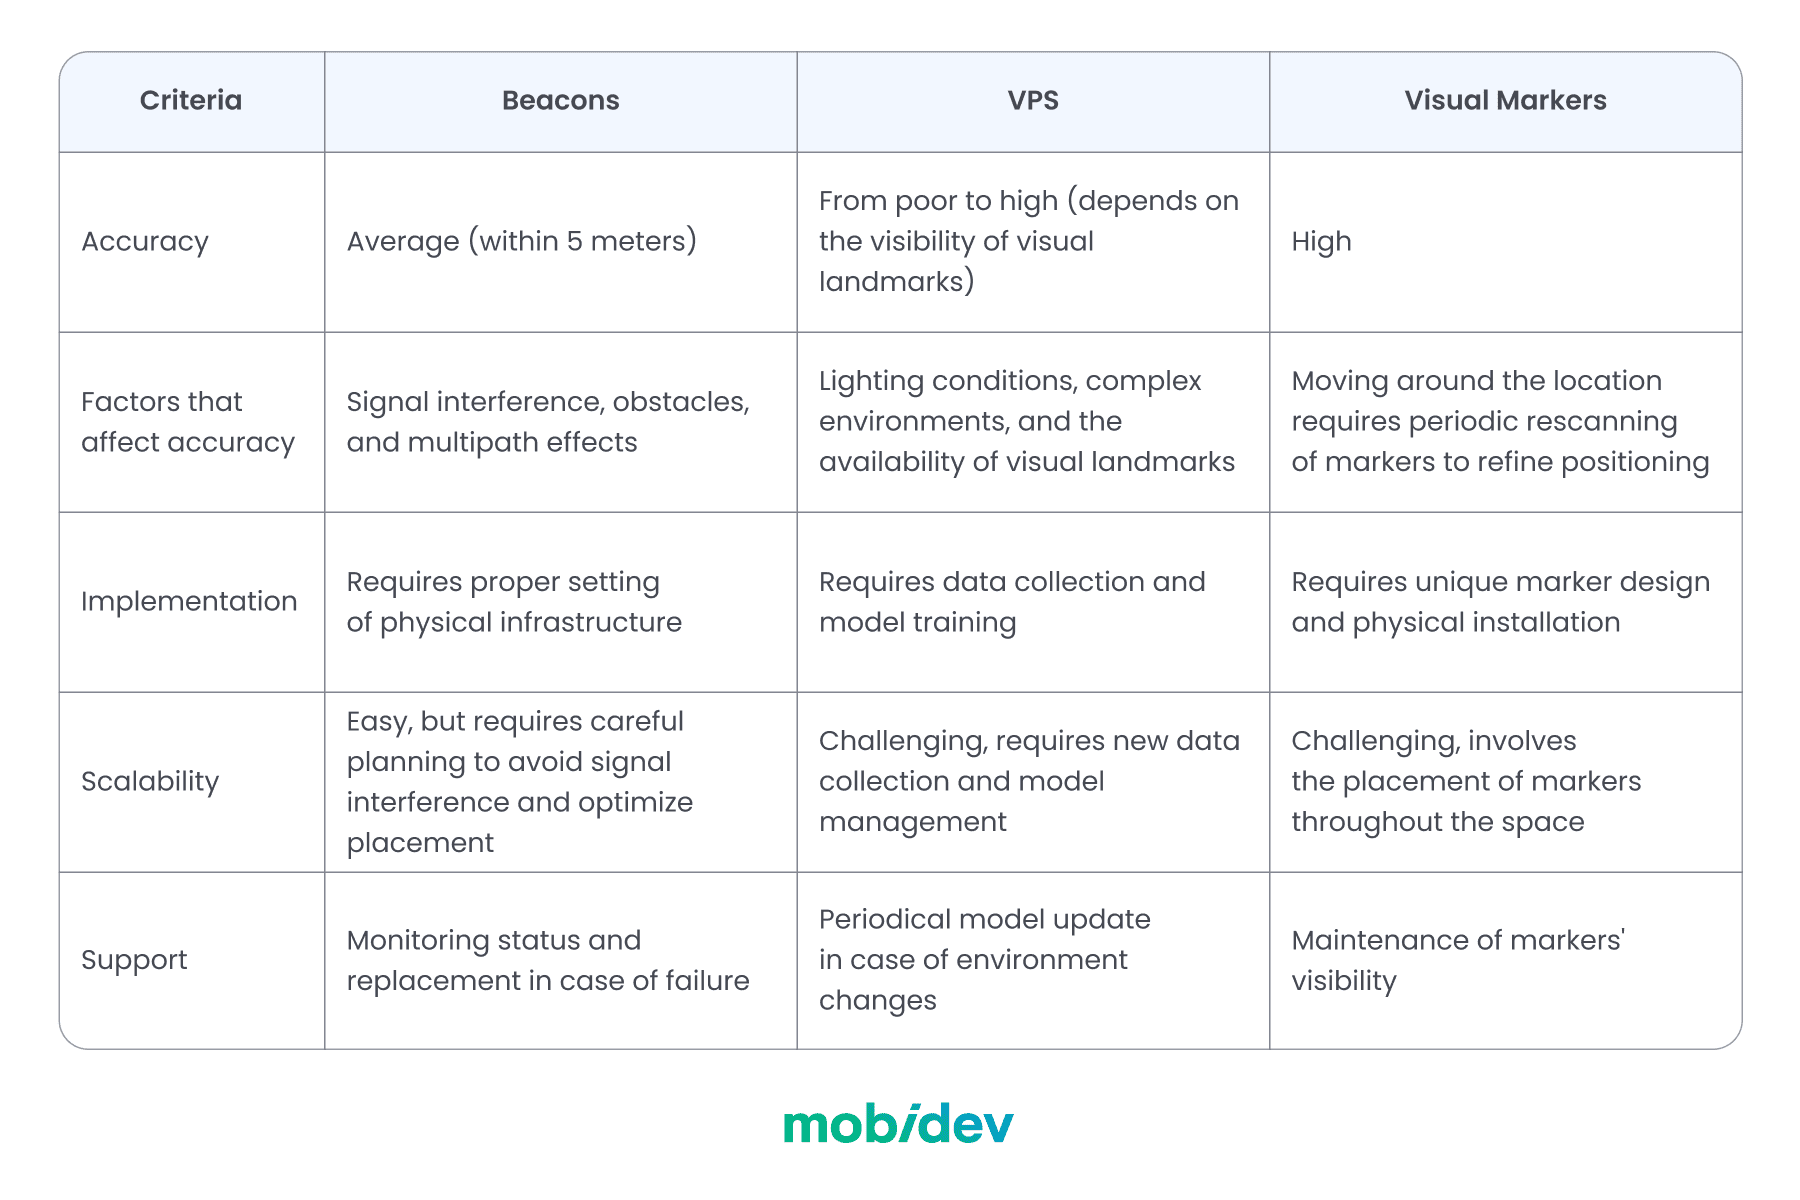
A brief comparison of indoor positioning technologies
APPROACH #1: BEACONS
Indoor positioning system beacons help devices locate their positions within buildings by measuring signals from these beacons. These provide more accuracy than GPS, but you need to purchase and physically place them in the building, as well as store the location of each beacon to calculate user location.
The strength of beacons is that it is a fairly mature technology that provides more predictable outcomes. Navigation with beacons doesn’t require a camera and is not so dependent on the environment. In this way, we can provide positioning even if visual input is not available for some reason or allow users to switch to 2D map navigation.

The accuracy of beacons can be within 5 meters, which is enough, for example, to navigate the user to the gate at the airport. But it may not be sufficient for small environments.
APPROACH #2: VISUAL POSITIONING SYSTEM (VPS)
Just as we search for landmarks with our eyes, visual positioning systems (VPS) can use your smartphone’s camera to analyze your surroundings and determine your location. One of the most notable applications of VPS is used in Google Maps.
However, using VPS isn’t so easy indoors. You’ll need to create your datasets and train artificial intelligence models to recognize those environments. You may face challenges if an environment changes over time (e.g. remodeling is done or if the furniture is moved frequently, new ad banners are placed, etc).
MOBIDEV’S RESEARCH ON USING VPS FOR INDOOR POSITIONING
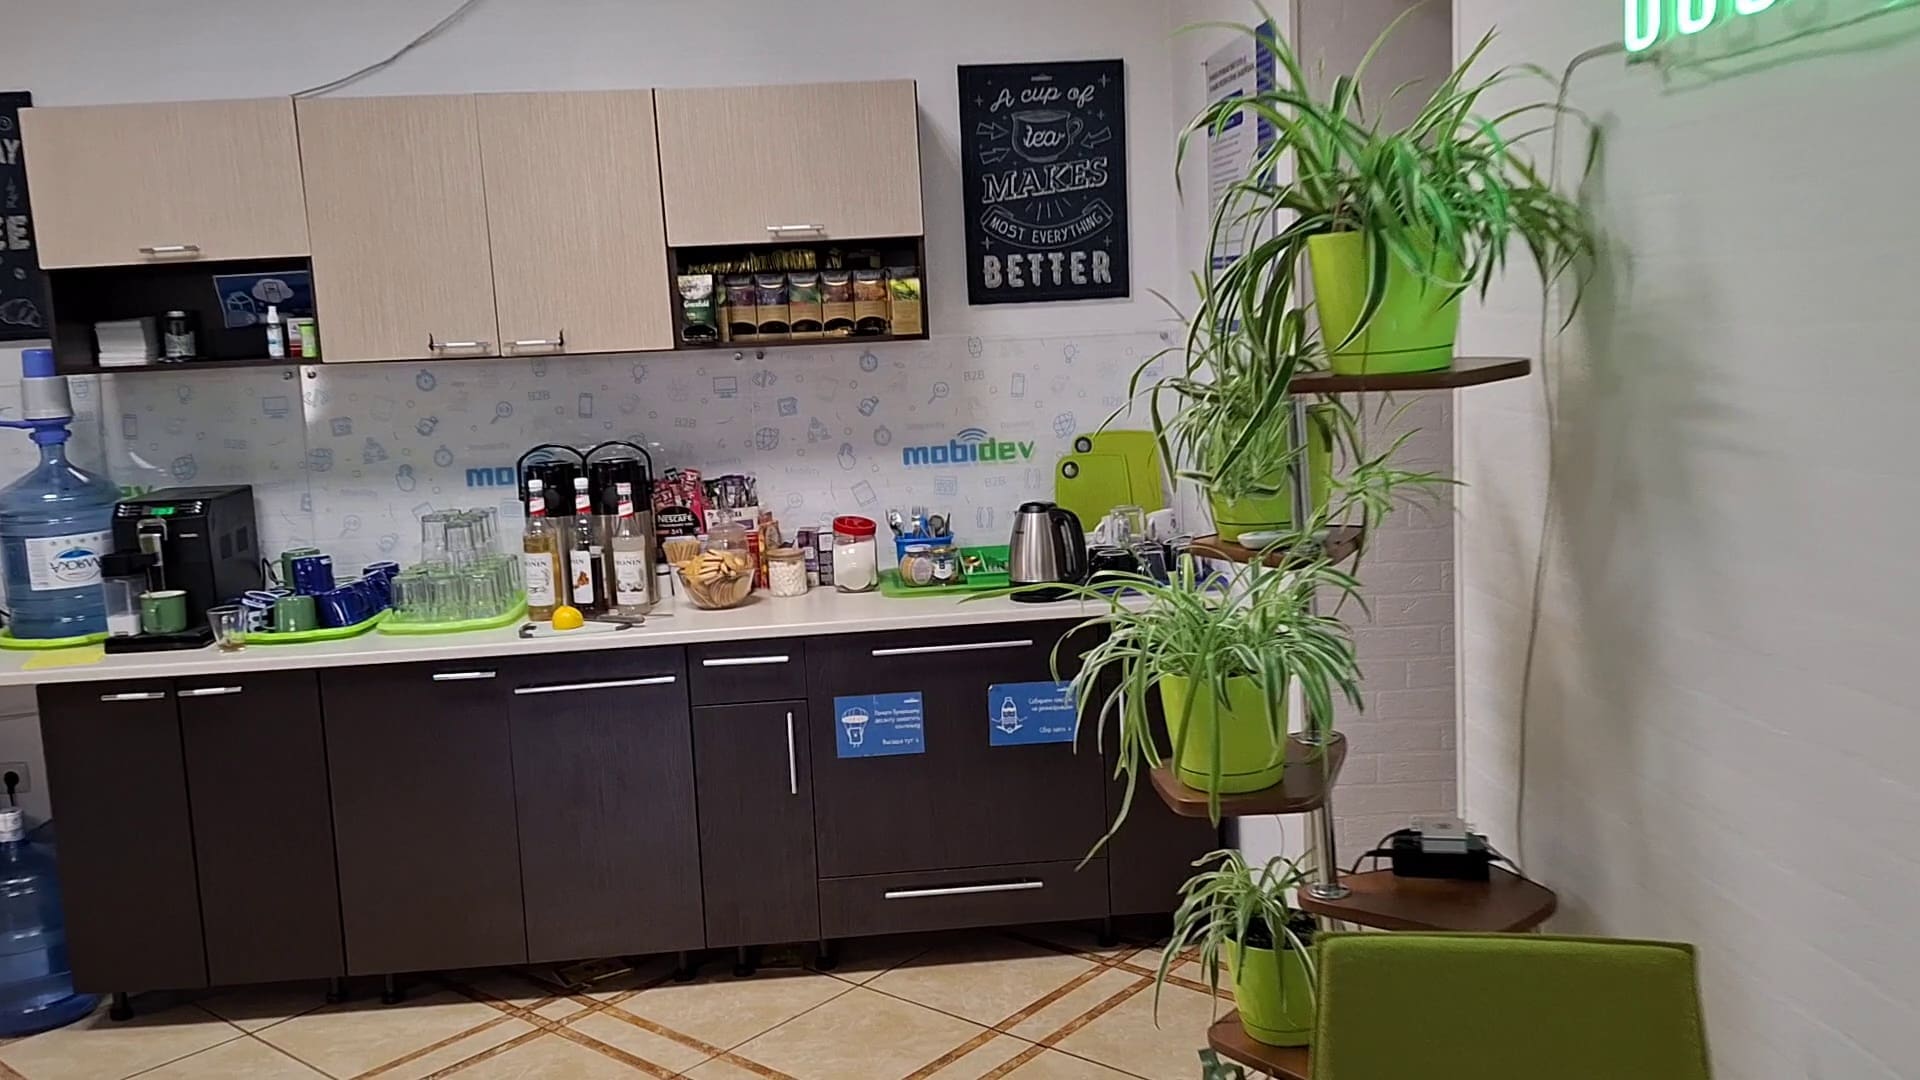
At MobiDev, we tested the capabilities of VPS by training a model for indoor positioning inside the kitchen of one of our offices. VPS allows us to determine the position inside the indoor scene quite accurately from a single image. However, this requires preparatory work on data collection, reconstruction, and model training. Let’s go through each step in more detail.
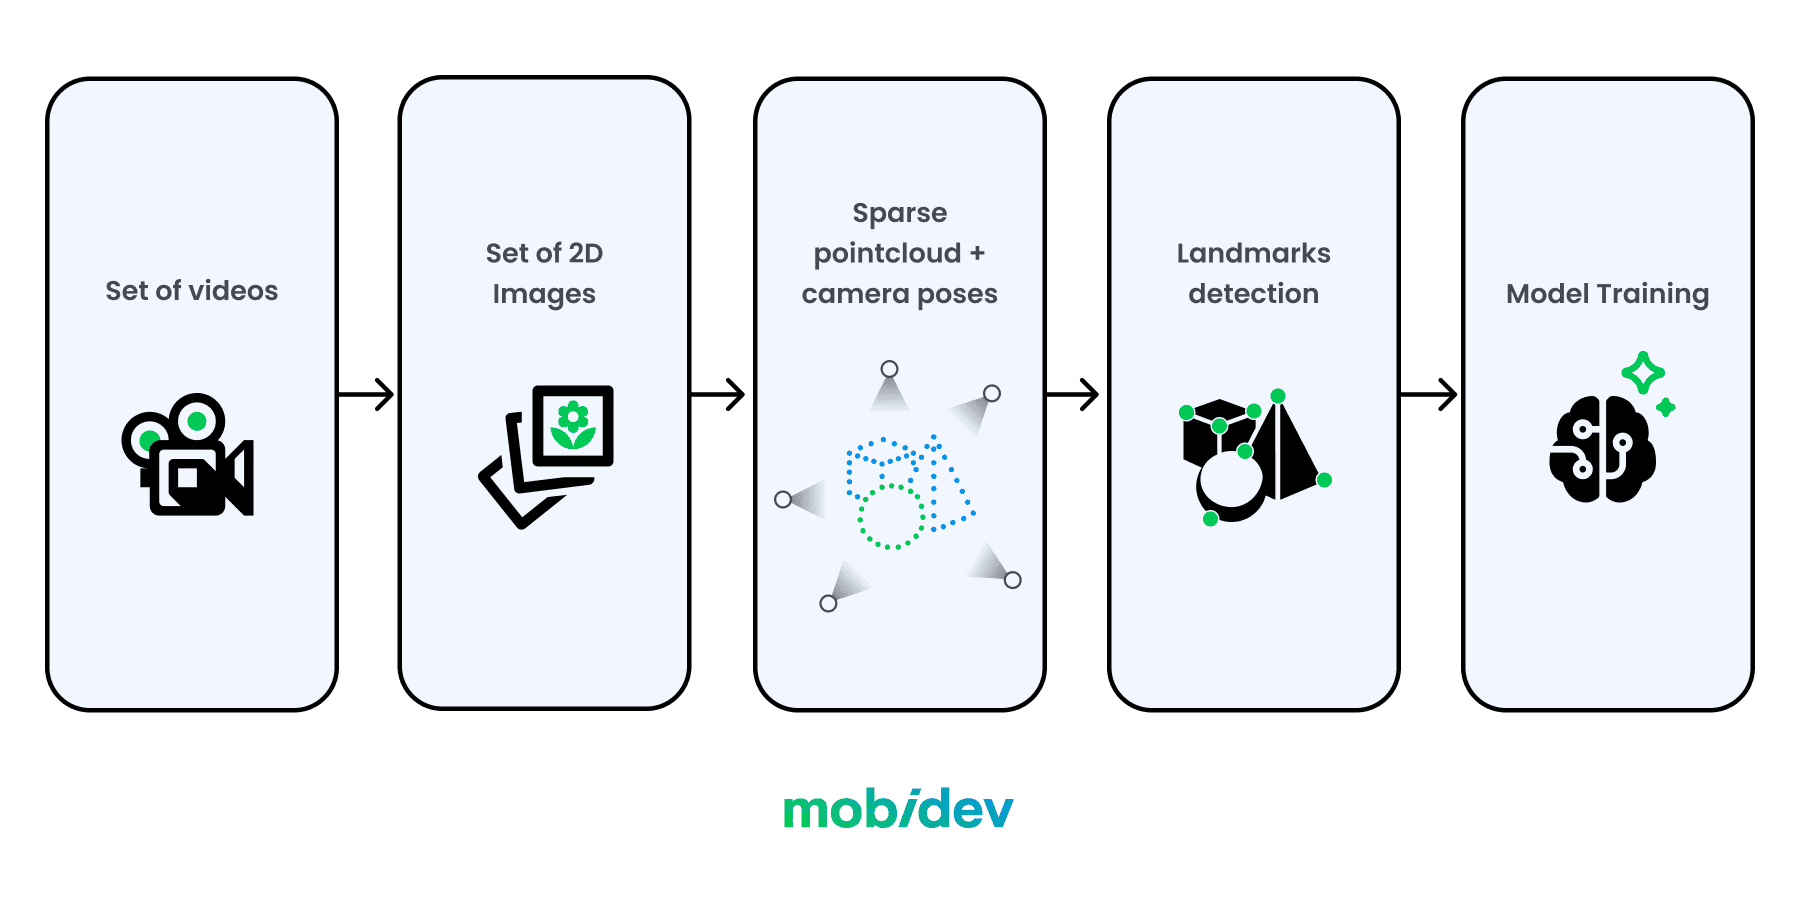
Step 1: Create a set of images with different routes through the indoor location
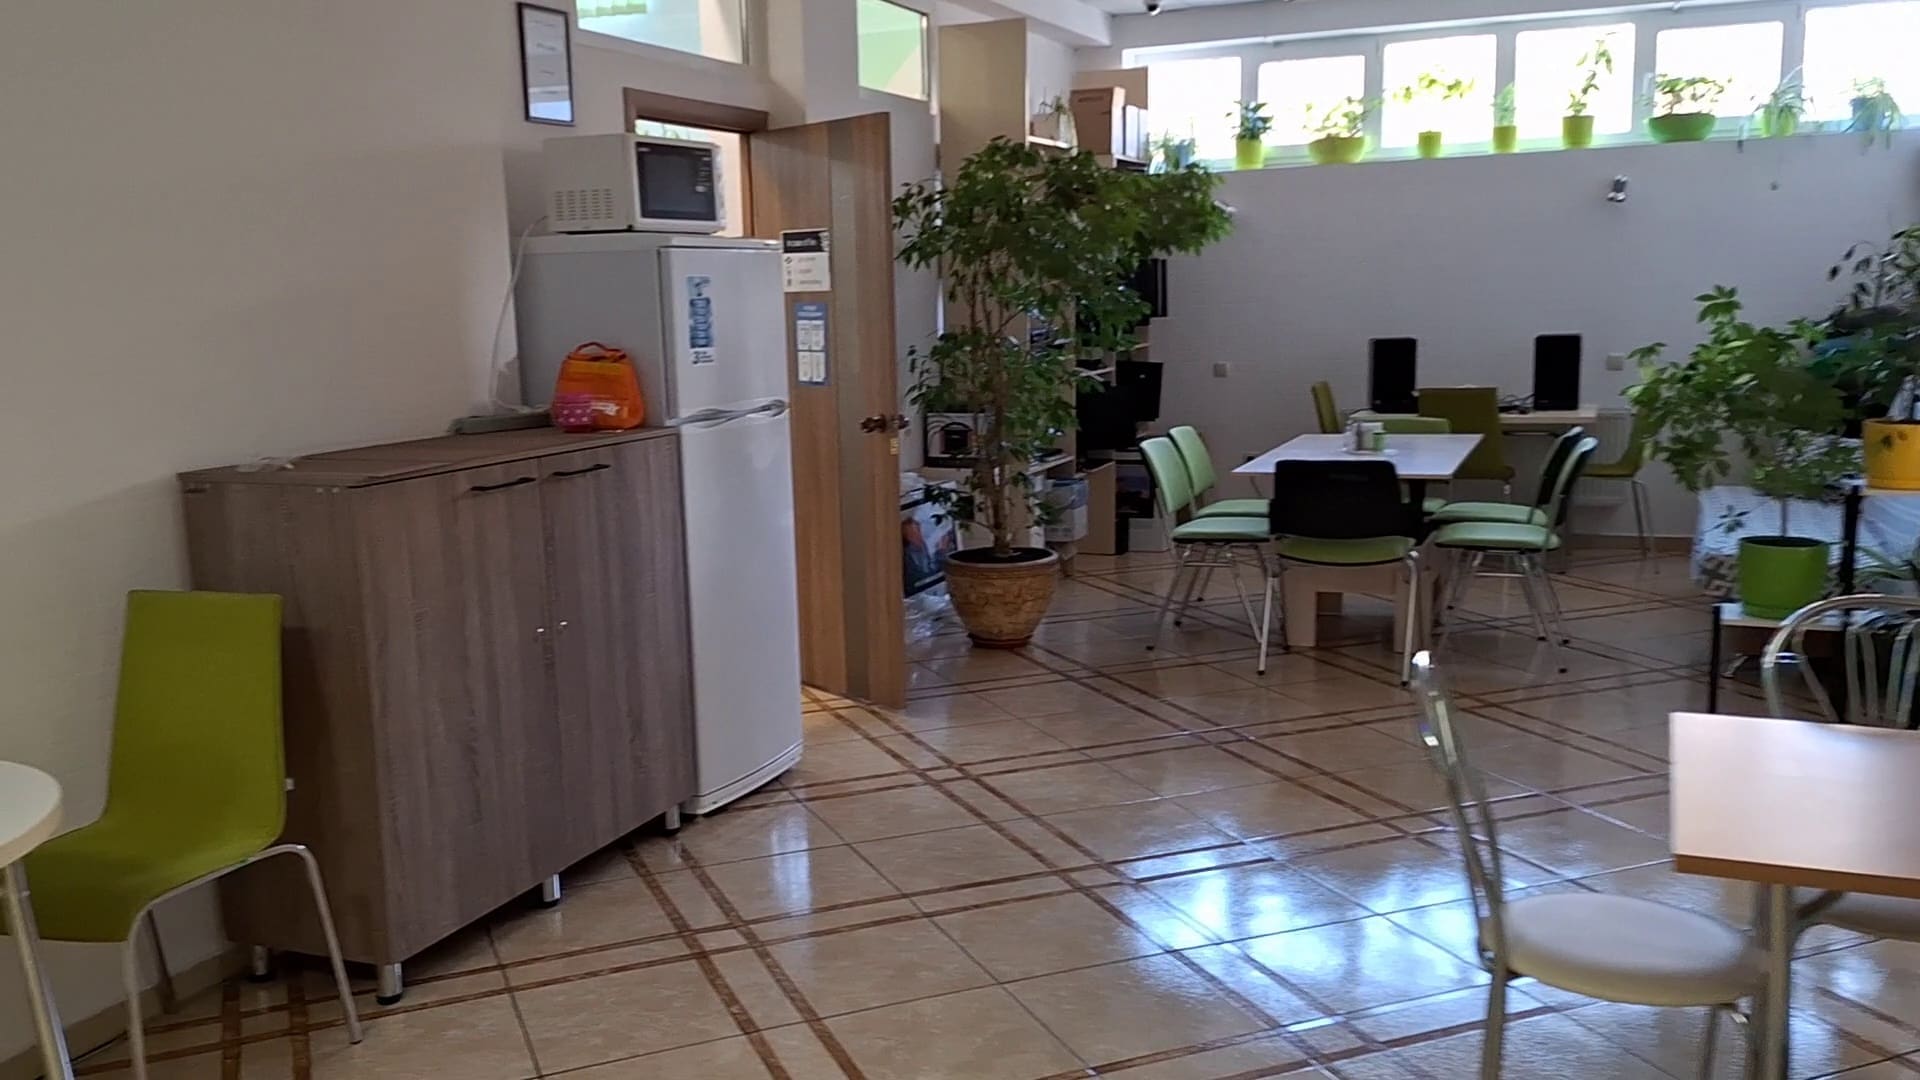
Filming should cover all areas of the premises and pass close to potential points of interest that will later be detected by VPS. It’s better to make several videos under different lighting conditions (for example, during the day and in the evening). We also need to remove all obstacles, including people and extraneous or temporary objects from the location before capturing a video.
Step 2: Create a three-dimensional reconstruction of the indoor location
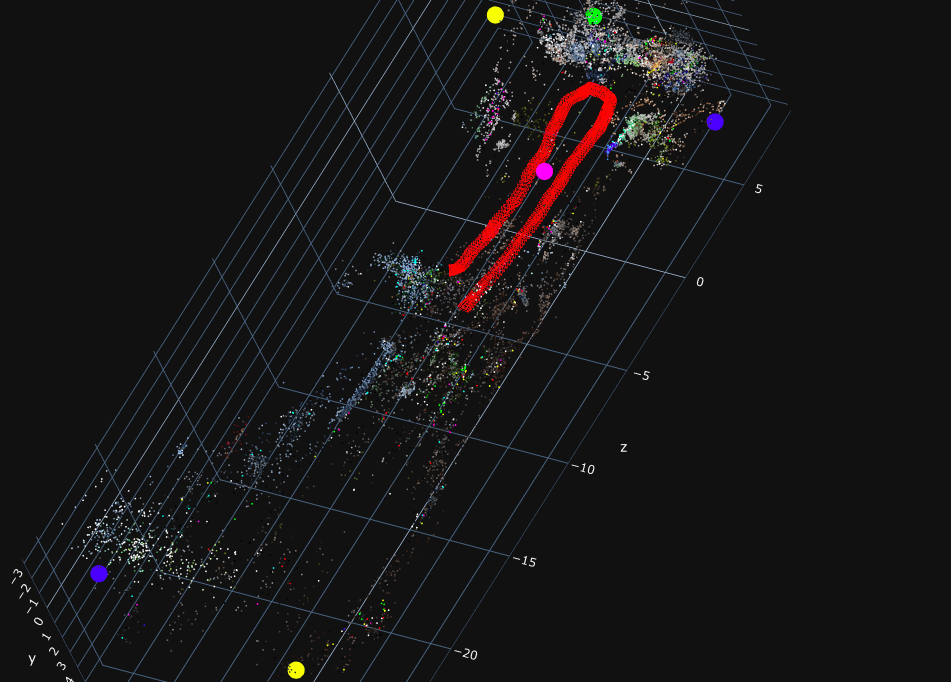
In such case sparse reconstruction – point cloud – would be appropriate. Given a set of video files, it is already possible to do this using structure-from-motion and multi-view stereo approaches.
The figure below shows a point cloud reconstructed from still images cut from video files. Red frustums mark the camera position for each frame.
If there is an insufficient set of source videos or they are of poor quality, the sparse reconstruction may fail and be unsuitable for further processing, as shown in the example below.
Step 3: Determine visual landmarks
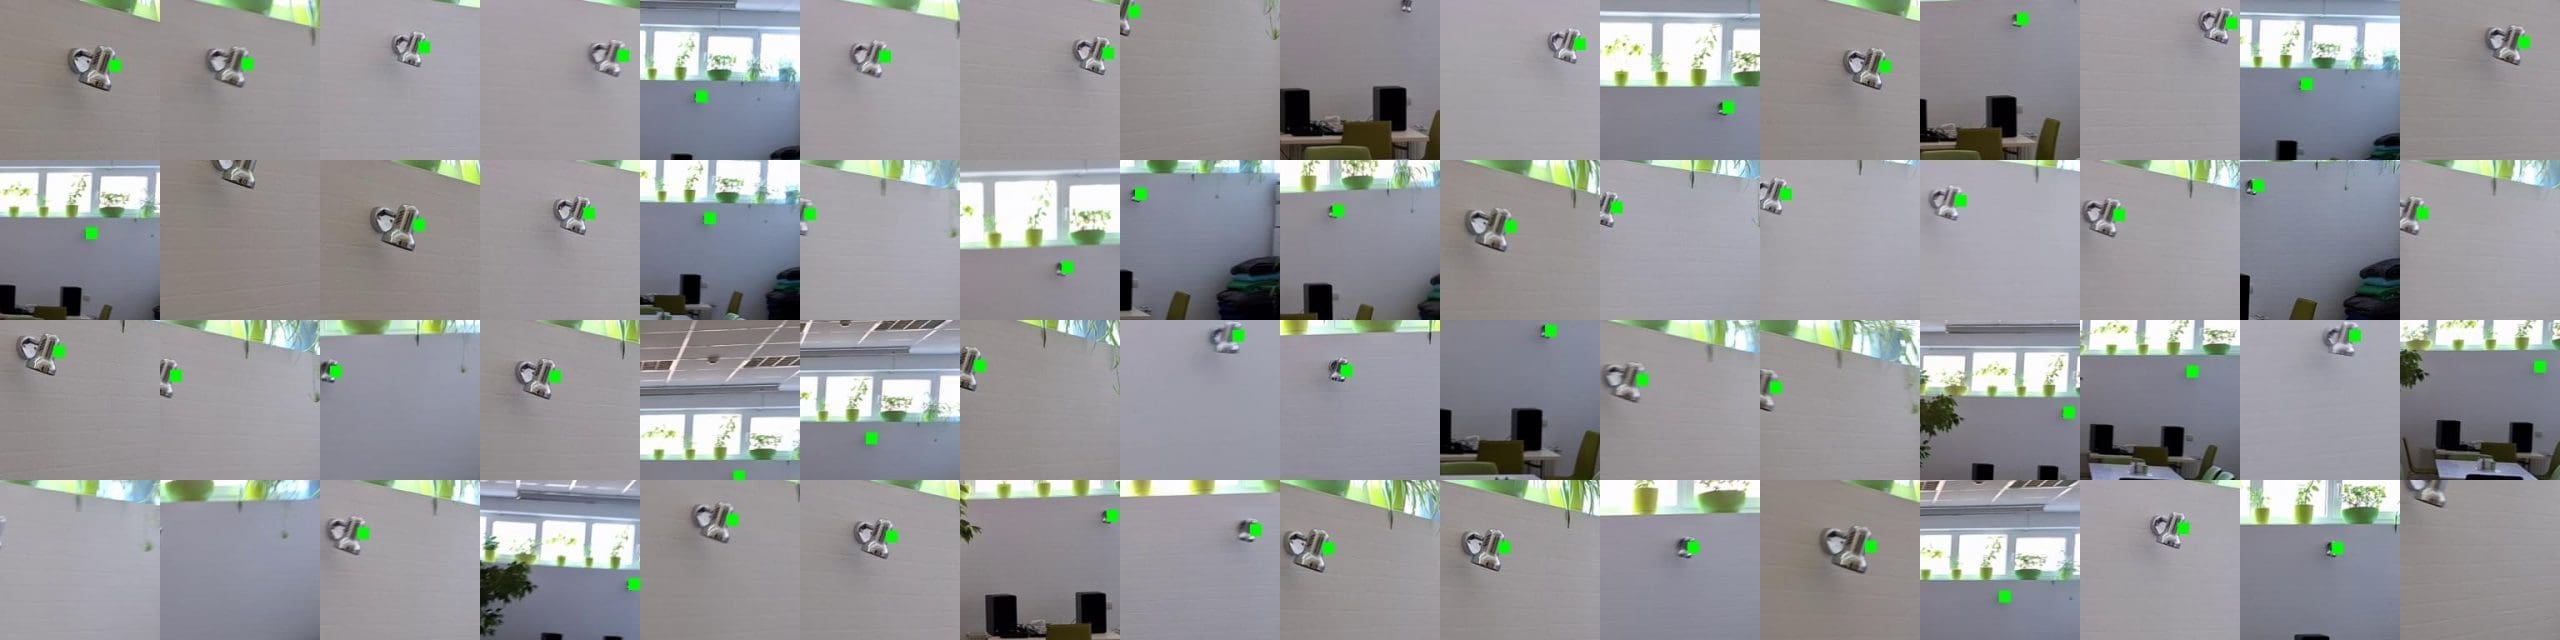
To ensure accurate positioning indoors, we need to find visual landmarks (points of interest) that will serve as the foundation for the position predictions made by VPS. Landmarks must be visible under different lighting conditions, and the best option is when the same points of interest are present in many different training images.
The images below show a couple of visual landmarks for further model training.

Step 4: Train the model
The point cloud, reconstructed for the indoor location, and the set of visual landmarks serve as training data for the VPS model. Typically, each model should be trained for each new room individually.
The trained VPS model takes an image depicting arbitrary space within the scene as input, and attempts to detect corresponding landmarks on it. Then based on this data, it predicts all six degrees of freedom of the camera in the scene space – the position and direction in which the snapshot was taken.
For example, let’s take a look at the image that was not included in the training dataset.
The camera position predicted by VPS is indicated by the green frustum.
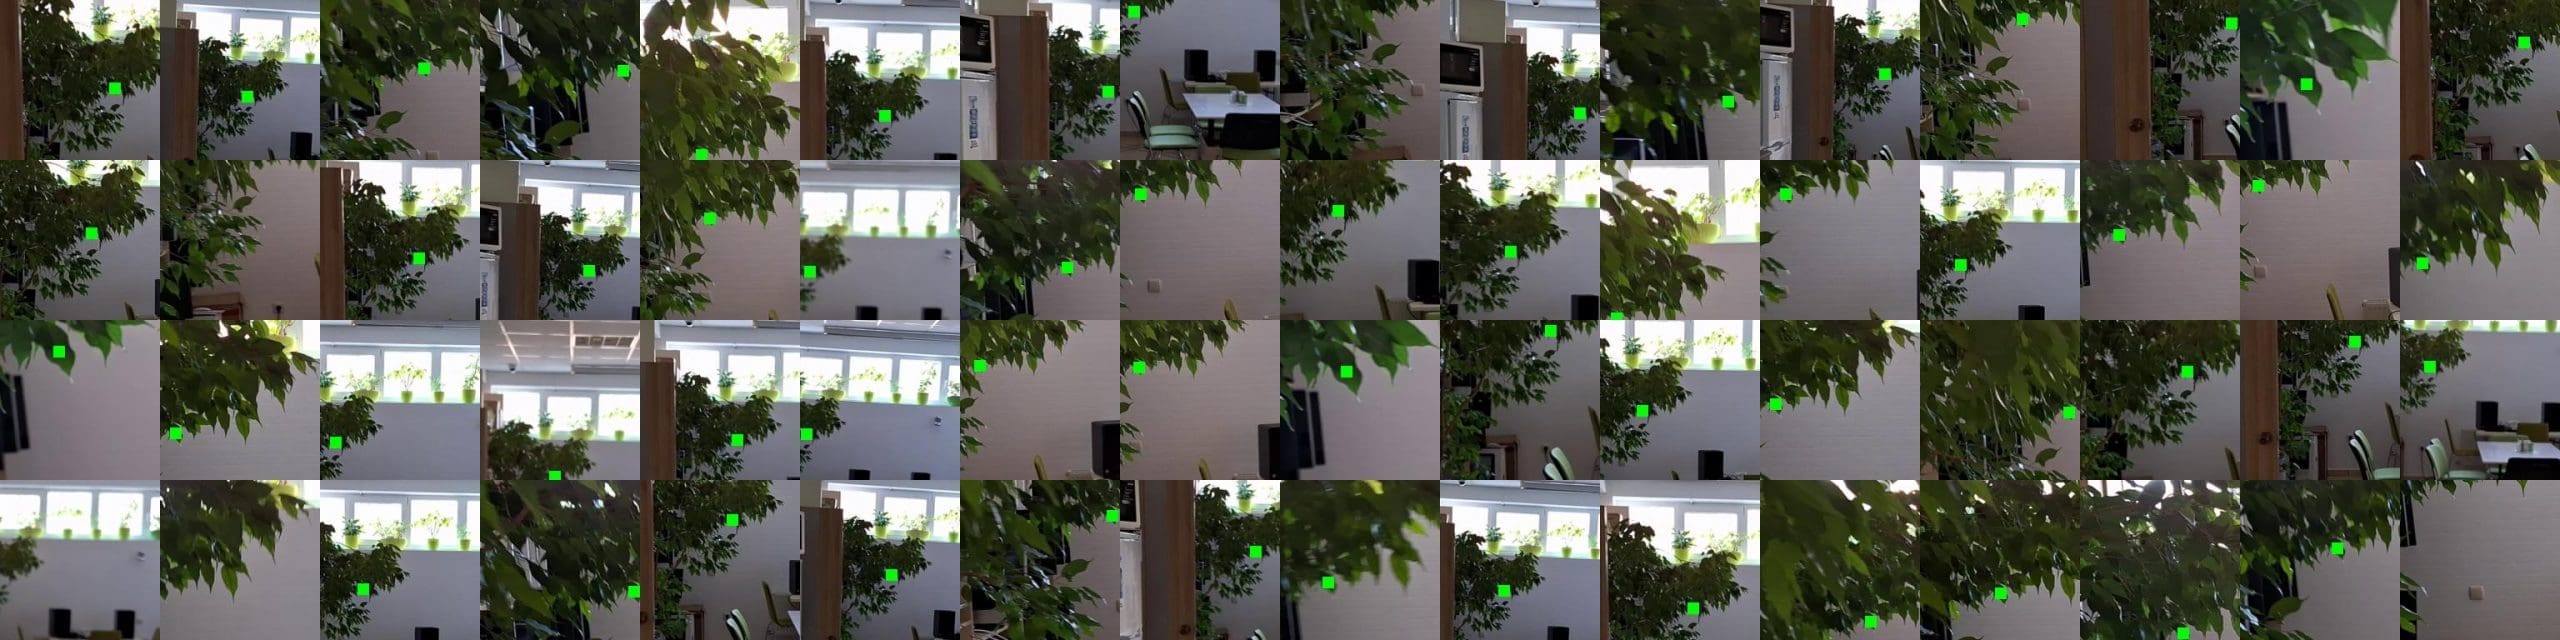
Another example is the opposite part of the room.

The accuracy of the predicted position may vary due to the presence of obstacles (objects, people) in the input image.
APPROACH #3: VISUAL MARKERS FOR INDOOR POSITIONING
A visual marker is an image that the system can recognize. Each marker has its own unique ID. When a marker is seen, it is compared against the entire list of markers to find a match. The markers contain data about the user’s position in 3D space. This includes what floor the user is on and where they are on that floor, as each floor can be determined by a user’s vertical coordinates.
Once implemented, the user will need to scan a marker to calibrate the application for navigation. How close the user’s camera should be to the barcode depends on the quality of the marker and the surface where it’s placed. In most cases, this should only be a few centimeters, but not too close to make it impossible for the barcode to be recognized.
Visual markers don’t require expensive AI training compared to VPS and are easier to configure than beacons, making them a potentially more cost-effective solution. But you should keep in mind that users have to rescan markers from time to time since the further we go from the starting point, the more imprecise the navigation becomes.
Marker maintenance is also important, as the markers need to be unobstructed and clean for best recognition.
A CHALLENGE: TOO MANY MARKERS
Another problem to consider is scale. Markers may not be the best option for large-scale and dynamic environments, since you have to configure a lot of markers to cover the whole space. This process can be time and labor-intensive.
Plus, every marker exists in a database used by the app. The more markers there are, the larger the dataset. The larger the dataset, the more processing time is needed to compare the captured image against that dataset to find a match. If the same app is used across multiple locations with thousands of markers, you have a few options to approach degraded performance.
One potential solution is to use different databases for each location. You can use the same marker style across multiple locations with this strategy. The user can select their location manually or may be able to obtain the location information from the local network.
However, despite all the listed challenges, the marker-based approach provides the highest level of accuracy of all indoor navigation options available today.
RULES FOR BUILDING AR MARKERS
For the marker system to work, the owners of the building will need to approve their placement and appearance. This is closely related to the following considerations:
- The more complexity a visual marker has, the easier it will be for the AR app to recognize it.
- Every marker must be unique, otherwise, the program may mistake one marker for another.
- Asymmetry will tell the program which side of the marker the user is on.
WHICH APPROACH TO CHOOSE?
A huge number of variables affect the choice of approach when creating indoor navigation. Each business case is unique, and therefore a combination of approaches often allows you to achieve the best results.
For example, let’s imagine that you want to create an indoor navigation system for an airport. You may run into some problems with visual markers. Since they require the user to scan one of these markers, this might cause a problem if it is not immediately nearby.
VPS might be a better alternative. By using the environment around the user instead of markers, the user will be able to initiate AR navigation from anywhere in the building. But if various parts of your building, like airport terminals, look very similar, then the system may need more information.
In this case, it may be wise to include beacons. The VPS system may be able to recognize the environment, but a nearby beacon may be able to help the system recognize where it is in the building.
MobiDev’s tech consultants will help you choose the best approach for your business case and create a clear technical vision of your future product. This will allow you to reduce risks and invest in solutions tailored to your business needs.
Book a call with a MobiDev representative
+1 916 243 0946 (USA/Canada)
How To Develop An AR Navigation Application
Once you have chosen indoor positioning technology, it is time to move directly to navigation tasks. Let’s look at the next steps in more detail.
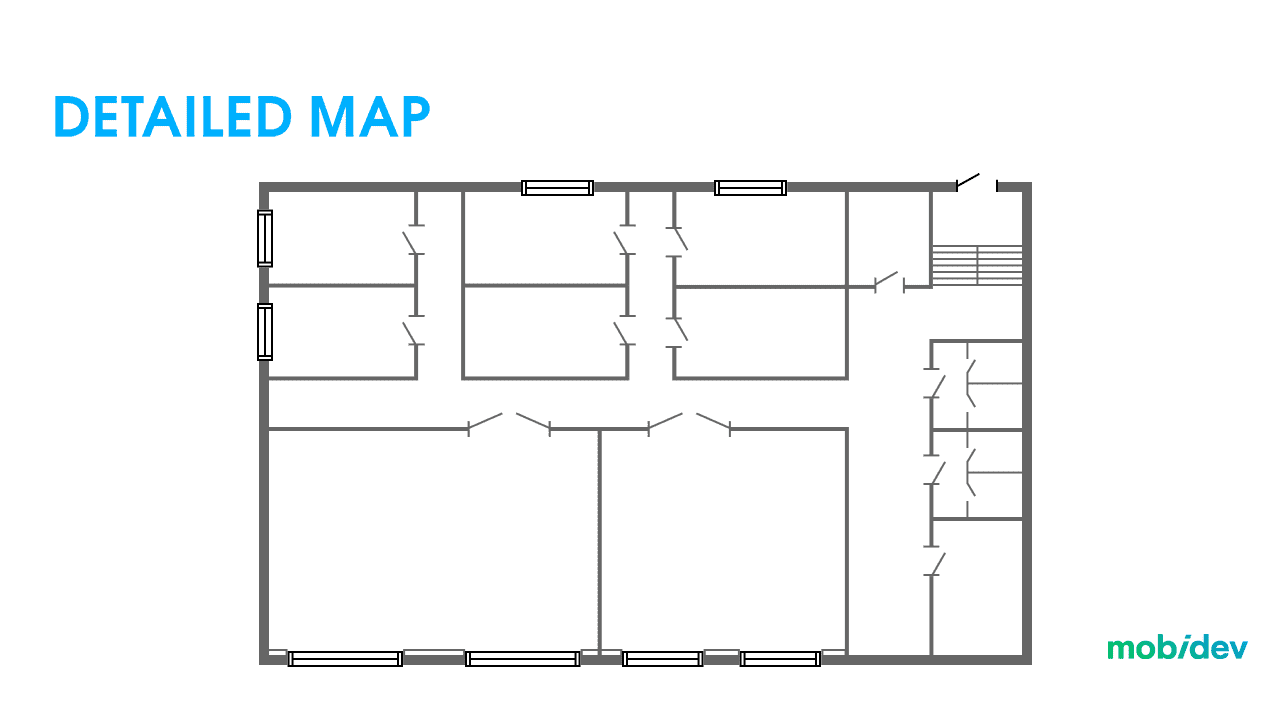
1. CREATE AN INDOOR MAP
Since we don’t have the luxury of using Google, Apple, or open-source mapping solutions to download or call via APIs, you need to accurately map the environment you want to navigate.
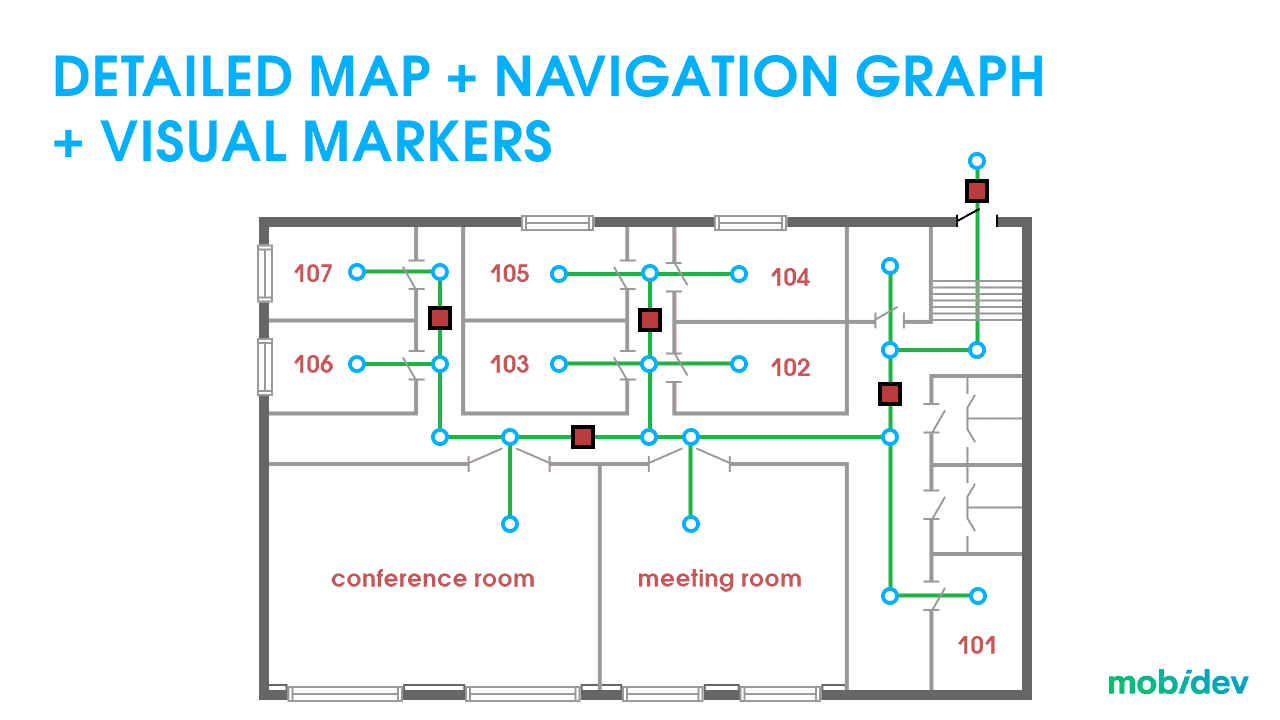
Now that we have a detailed map, it must be populated with metadata. This stage is quite similar, regardless of the chosen positioning approach. When using beacons we need to know the relationship between their position and the map. Same for markers. With VPS, we need to convert point cloud coordinates to map coordinates.
This is called the navigation graph. The navigation options depend on the points on the graph: the system will know about a certain location to navigate to by referring to the graph.
2. DRAWING ROUTES FOR INDOOR AR NAVIGATION
With the navigation graph and position determined, we can now plot the route and create visuals to direct users to their destination. However, there are some important considerations to keep in mind.
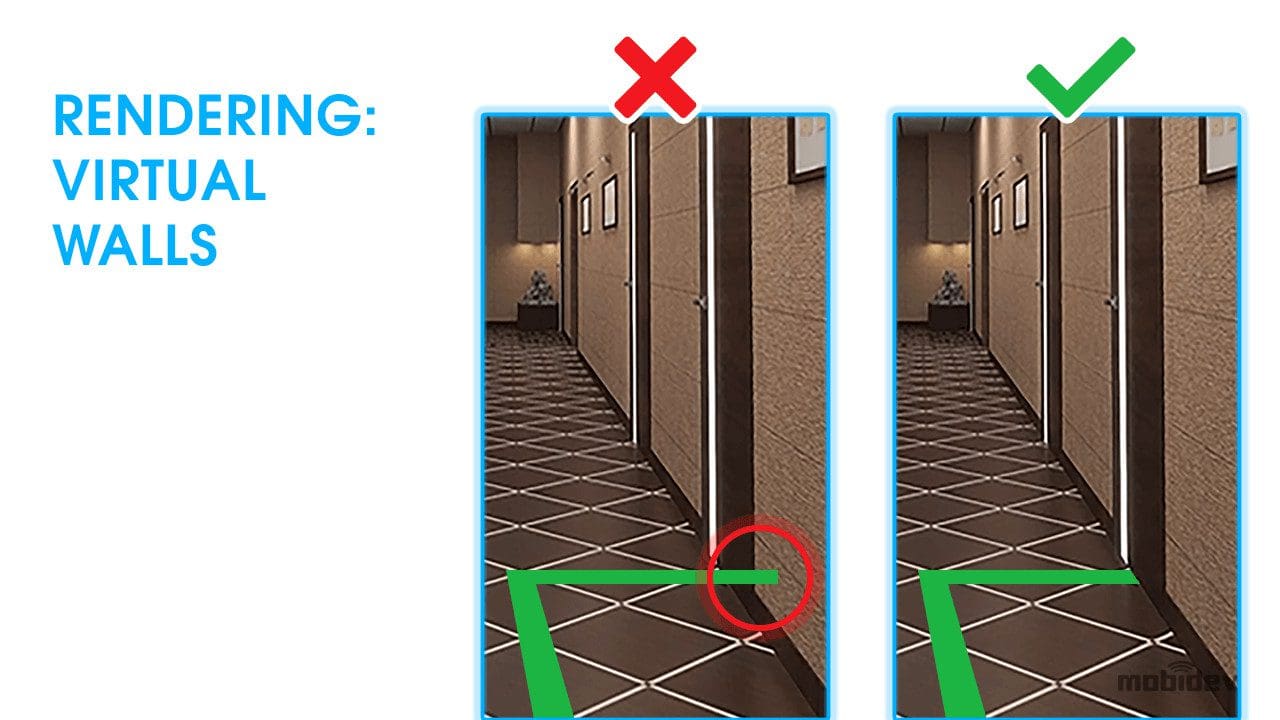
One of the main obstacles to overcome is occlusion. The AR 3D layer content is placed on top of the real world on the user’s screen in most contexts. However, this could be confusing to look at if the lines are drawn on top of or through walls. It’s important to consider occlusion so that users can be guided to their destinations more naturally.
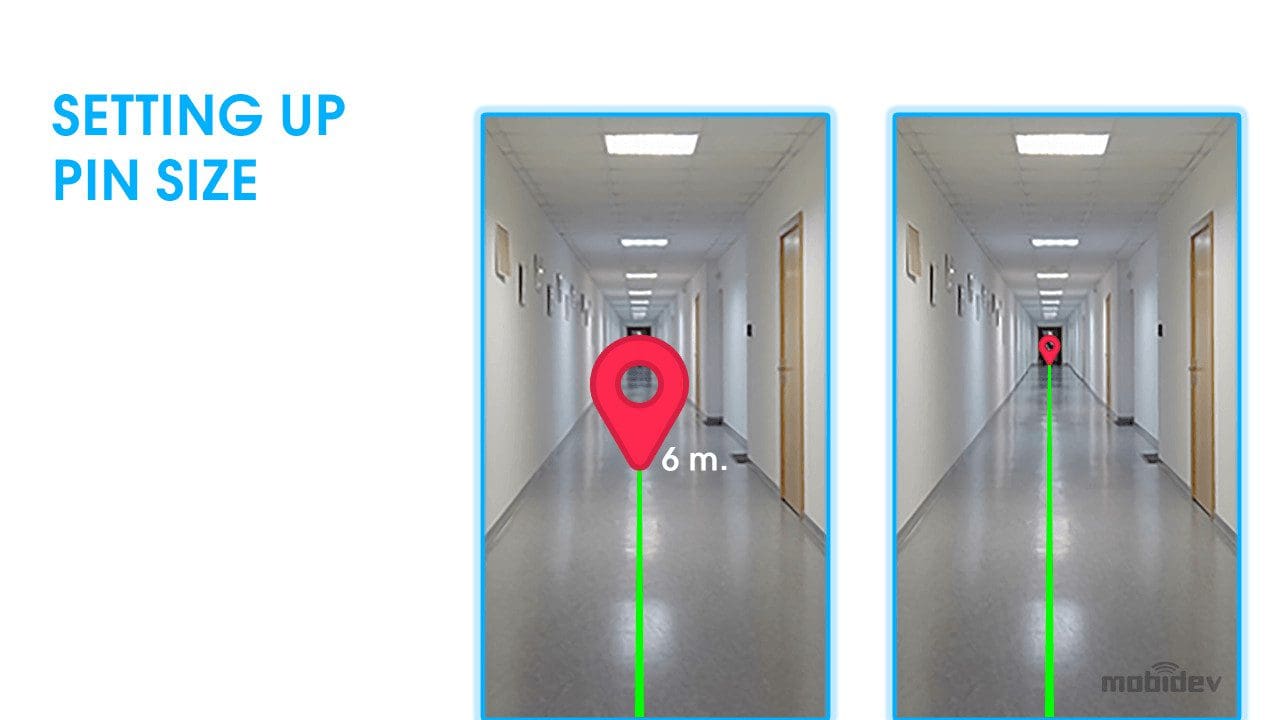
Understanding size and distance is also a vital part of the process. Objects that are farther away appear smaller from the perspective of the user. The most important virtual object for this process is the destination pin. When the user can see the destination pin on their screen, it should appear larger when near and smaller when farther away.
AR Navigation SDK Development
If you’re looking to build an SDK to scale the solution to more premises or monetize it as a standalone navigation app, the project becomes a bit more complicated. In addition to navigation, you will have to think about how to ensure platform compatibility. The bare minimum for compatibility would be Android and iOS. Ideally, you would also be able to support Flutter, React Native, Native Script, and other platforms.
To do this, much of your attention will need to be spent on writing documentation that will help your customers to conveniently adopt your solution. Other considerations include license keys and payment. In our experience, a project of this scale can take 1.5 to 2 years of development (about 7-13 thousand hours).
Current Limitations Of AR Indoor Navigation Technology
AR navigation is a truly exciting technology, but it has limitations that need to be considered. AR indoor navigation can lead us in the right direction. It can tell us which way to get to the right department of a store. It can help us get into the general vicinity of a ward of a hospital, or help get us going in the direction of a particular area of an airport. However, at this stage of indoor positioning technology development, it can’t lead us directly to a certain product on a shelf, or to a particular book at the library. Here we’d need centimeter accuracy, and that’s just not possible yet. You should take this into account when planning your project.
Future Of Indoor Navigation: Increasing Accuracy And Detail
It’s important to set your expectations correctly when it comes to AR indoor navigation. As it stands right now, modern technology doesn’t have the precision to make indoor navigation work like it does in science fiction. However, that doesn’t have to be the case forever. New technologies and innovations are on the horizon, and the field will continue to advance. We should look forward to what lies ahead.
ULTRA-WIDEBAND
For example, Ultra-Wideband beacons will help provide more accurate coordinates for devices. However, they use more power than other technologies and their signals cannot penetrate walls. Once their APIs are made available, they may work well in open indoor environments like airports, where beacons might be mounted on ceilings for better connectivity.
ROOM SCANNING
Room scanning technologies are already making it easier for indoor locations to be mapped in 3D space, meaning that it may only be a matter of time before more accessible visual positioning solutions are possible for businesses. For now, these technologies become the basis of AR measurement solutions that help measure and calculate environmental objects.

Why Choose MobiDev For AR Navigation Development
Development of AR indoor navigation products requires years of experience because each project is unique and the team must be able to meet these business needs. Our AR app development services can help you find the solutions you need to gain an edge in the market. Combining AR with advanced artificial intelligence and machine learning algorithms can help you provide even more accurate and realistic AR experiences.
If you are not sure which solution will bring the most benefit to your business, you can always take advantage of our tech consulting services. Together with our colleagues, we will gladly study the needs of your business, create a clear tech vision for your product, and bring it to life. MobiDev aims for long-term customer relationships and can become a reliable software development partner for your current and future projects.
If you’ve weighed the pros and cons of getting into the AR indoor navigation app development process and decided to launch your project, we’d love to help you on your journey. Contact us to get started!


