
Contents:
Augmented reality has evolved from its origin as an experimental and novel technology to a practical business tool. Across many industries, businesses have adopted AR for various spatial applications like generating floor plans, applying décor elements to rooms, and home repair estimates. Each of these technologies utilizes the unique capability of AR to function as a measuring tool with a customer’s smartphone.
However, taking advantage of this market requires deep expertise in AR SDKs and machine learning algorithms. Understanding the technologies involved in developing AR measurement applications is critical to bringing your idea to market. Let’s explore how these applications are built step by step.
What is Augmented Reality Measurement and How it Works
AR measurement is the use of the power of augmented reality technology to measure physical objects or distances in the real world using digital tools. Implementing this technology looks different depending on your application.
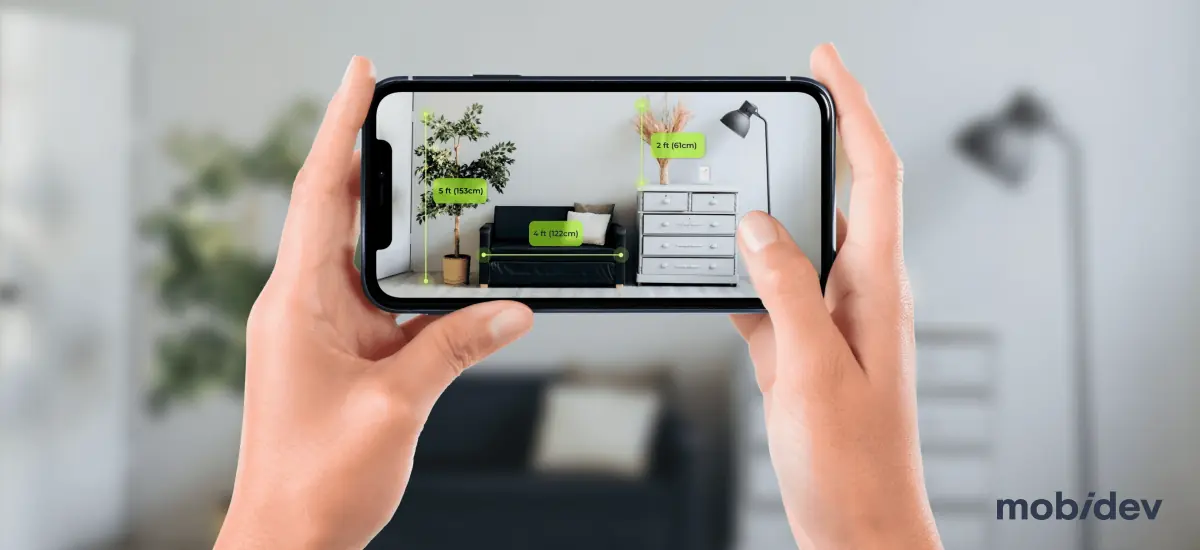
For example, AR rulers are a popular choice for users to measure the distance between two points by using the camera and motion sensors on their device as well as a depth sensor (if available) to improve accuracy.
Alternatively, AR measuring tools might only be a means to an end. For example, let’s say the user is virtually changing the wallpaper of a room. Calculating the dimensions of the walls in the room can help the user understand how much wallpaper they will need to buy and how much it will cost.
To run an AR measurement app on a device, you’ll need the following technologies:
1. Smartphone cameras, motion sensors, and preferably depth sensors:
- LiDAR for iOS
- Time of Flight (ToF) for Android or other LiDAR equivalent hardware
2. ARKit and ARCore SDKs with rendering engine to render AR content on screens
3. In some cases, machine learning algorithms
The Power of LiDAR for Developing Measuring Apps
While AR SDKs like ARKit and ARCore have built-in measurement capabilities, they come with certain limitations. For instance, ARKit excels at recognizing horizontal surfaces but struggles with vertical ones. This is because horizontal surfaces are always perpendicular to the gravity vector, making their orientation easier to determine. Vertical surfaces, however, pose more challenges, as they can be located at varying distances and angles relative to the gravity vector. This is where augmented reality alone falls short, and developers need additional hardware or software to compensate.
LiDAR stands out as one of the most powerful sensors available for smartphones to comprehend the dimensions of their surroundings. As a depth sensor, LiDAR calculates the time it takes for infrared lasers to reflect off surfaces and return to the sensor. This enables the creation of more accurate meshes by providing precise spatial information about the environment. Consequently, LiDAR significantly enhances the accuracy and reliability of AR measuring applications.
LiDAR scanners are available on the Pro and Pro Max models of the iPhone 12 and later, as well as the 11-inch and 12.9-inch iPad Pro models from 2020 and later. This integration allows these devices to leverage advanced depth-sensing technology for superior AR experiences.
Limitations of LiDAR
Although LiDAR is one of the most powerful tools supporting AR measurement apps, it does have some limitations, such as:
- Lighting conditions: although LiDAR uses its own infrared lighting and can function in complete darkness, it does have its limits. LiDAR will not work as well in direct sunlight, fog, rain, or snow, and dust.
- Reflective surfaces: mirrors and glass can cause problems with LiDAR.
- Distance: if the surface is too far from the sensor, measurements will be less accurate. The current distance limit on iPhones and iPads is 5 meters. The optimal operating distance is about 1-1.5 meters.
- Resolution: Instead of capturing images as pixels, LiDAR emits a grid of infrared dots which are used to measure depth, and this means LiDAR can’t “see” the small details that fall between the grid.
When building a LiDAR-based AR measurement application, addressing these limitations when they become relevant will be important for maintaining the quality and success of your project.
Depth Sensors on Android
Android has a similar sensor to LiDAR called Time of Flight (ToF), and it’s available on a limited series of devices. Currently, ARCore can’t create the same detailed mesh as ARKit, making iOS the primary focus in the development of AR applications. This is why many AR projects prioritize iOS for its advanced capabilities and consistent performance.
Rendering AR Content
AR SDKs with 3D engines like SceneKit, Metal, RealityKit, Sceneform, Unity, Unreal, and OpenGL are crucial for rendering AR content on screen after measuring space. The two most popular SDKs for developing AR content for smartphones are ARKit for Apple devices and ARCore for Android devices. Both SDKs have similar capabilities, but the performance is often limited by the device’s hardware. Apple devices usually offer better AR performance due to their superior and consistent hardware, while Android devices vary widely in their hardware specifications.
Challenges of Developing Augmented Reality Apps for Measurement
Before we explore how the development process works, let’s investigate the challenges you need to be ready to face when building an AR measurement application.
Tracking
This is a critical step for any AR application. Since you’re trying to analyze a scene from a handheld camera, the camera will be moving. Being able to track all the elements in the scene is important for the quality of the app experience, and more importantly, it can affect the accuracy and precision of your measurements. You can account for tracking with software, but you should also consider the human user — on-screen directions like “move closer” or “take a few steps back” can help them use the application correctly to capture their scene effectively.
Accuracy
No matter what project you’re working on, your measurement accuracy will be affected by various factors. Conditions like lighting, human error, object complexity, and surface reflectivity can adversely affect your measurement application.
We find that indoor environments are much better for measuring than outdoor environments because of these variables. However, very large indoor spaces can be tricky to work with, since AR infrared sensors can only see so far. Additionally, some outdoor spaces can work well, since lighting is abundant, provided you aren’t overwhelming the sensor with too much light.
Performance
AR measurement apps are resource-heavy, consuming power quickly and potentially slowing down other device features. To mitigate this, optimize the app’s code for the specific platform, use efficient algorithms for processing, and reduce unnecessary features and graphics.
How to Build an AR Measurement App Step by Step
The key to developing your AR measurement application is to think carefully about its future. Clearly define the requirements of the project, like its technical requirements and the features you want to create. It’s always a good idea to seek the insight of AR consulting experts to examine the feasibility of your idea before development begins. This helps mitigate risks and ensures more informed investment in your project.
Interested in AR Consulting?
Learn moreComponents of an AR Measurement App
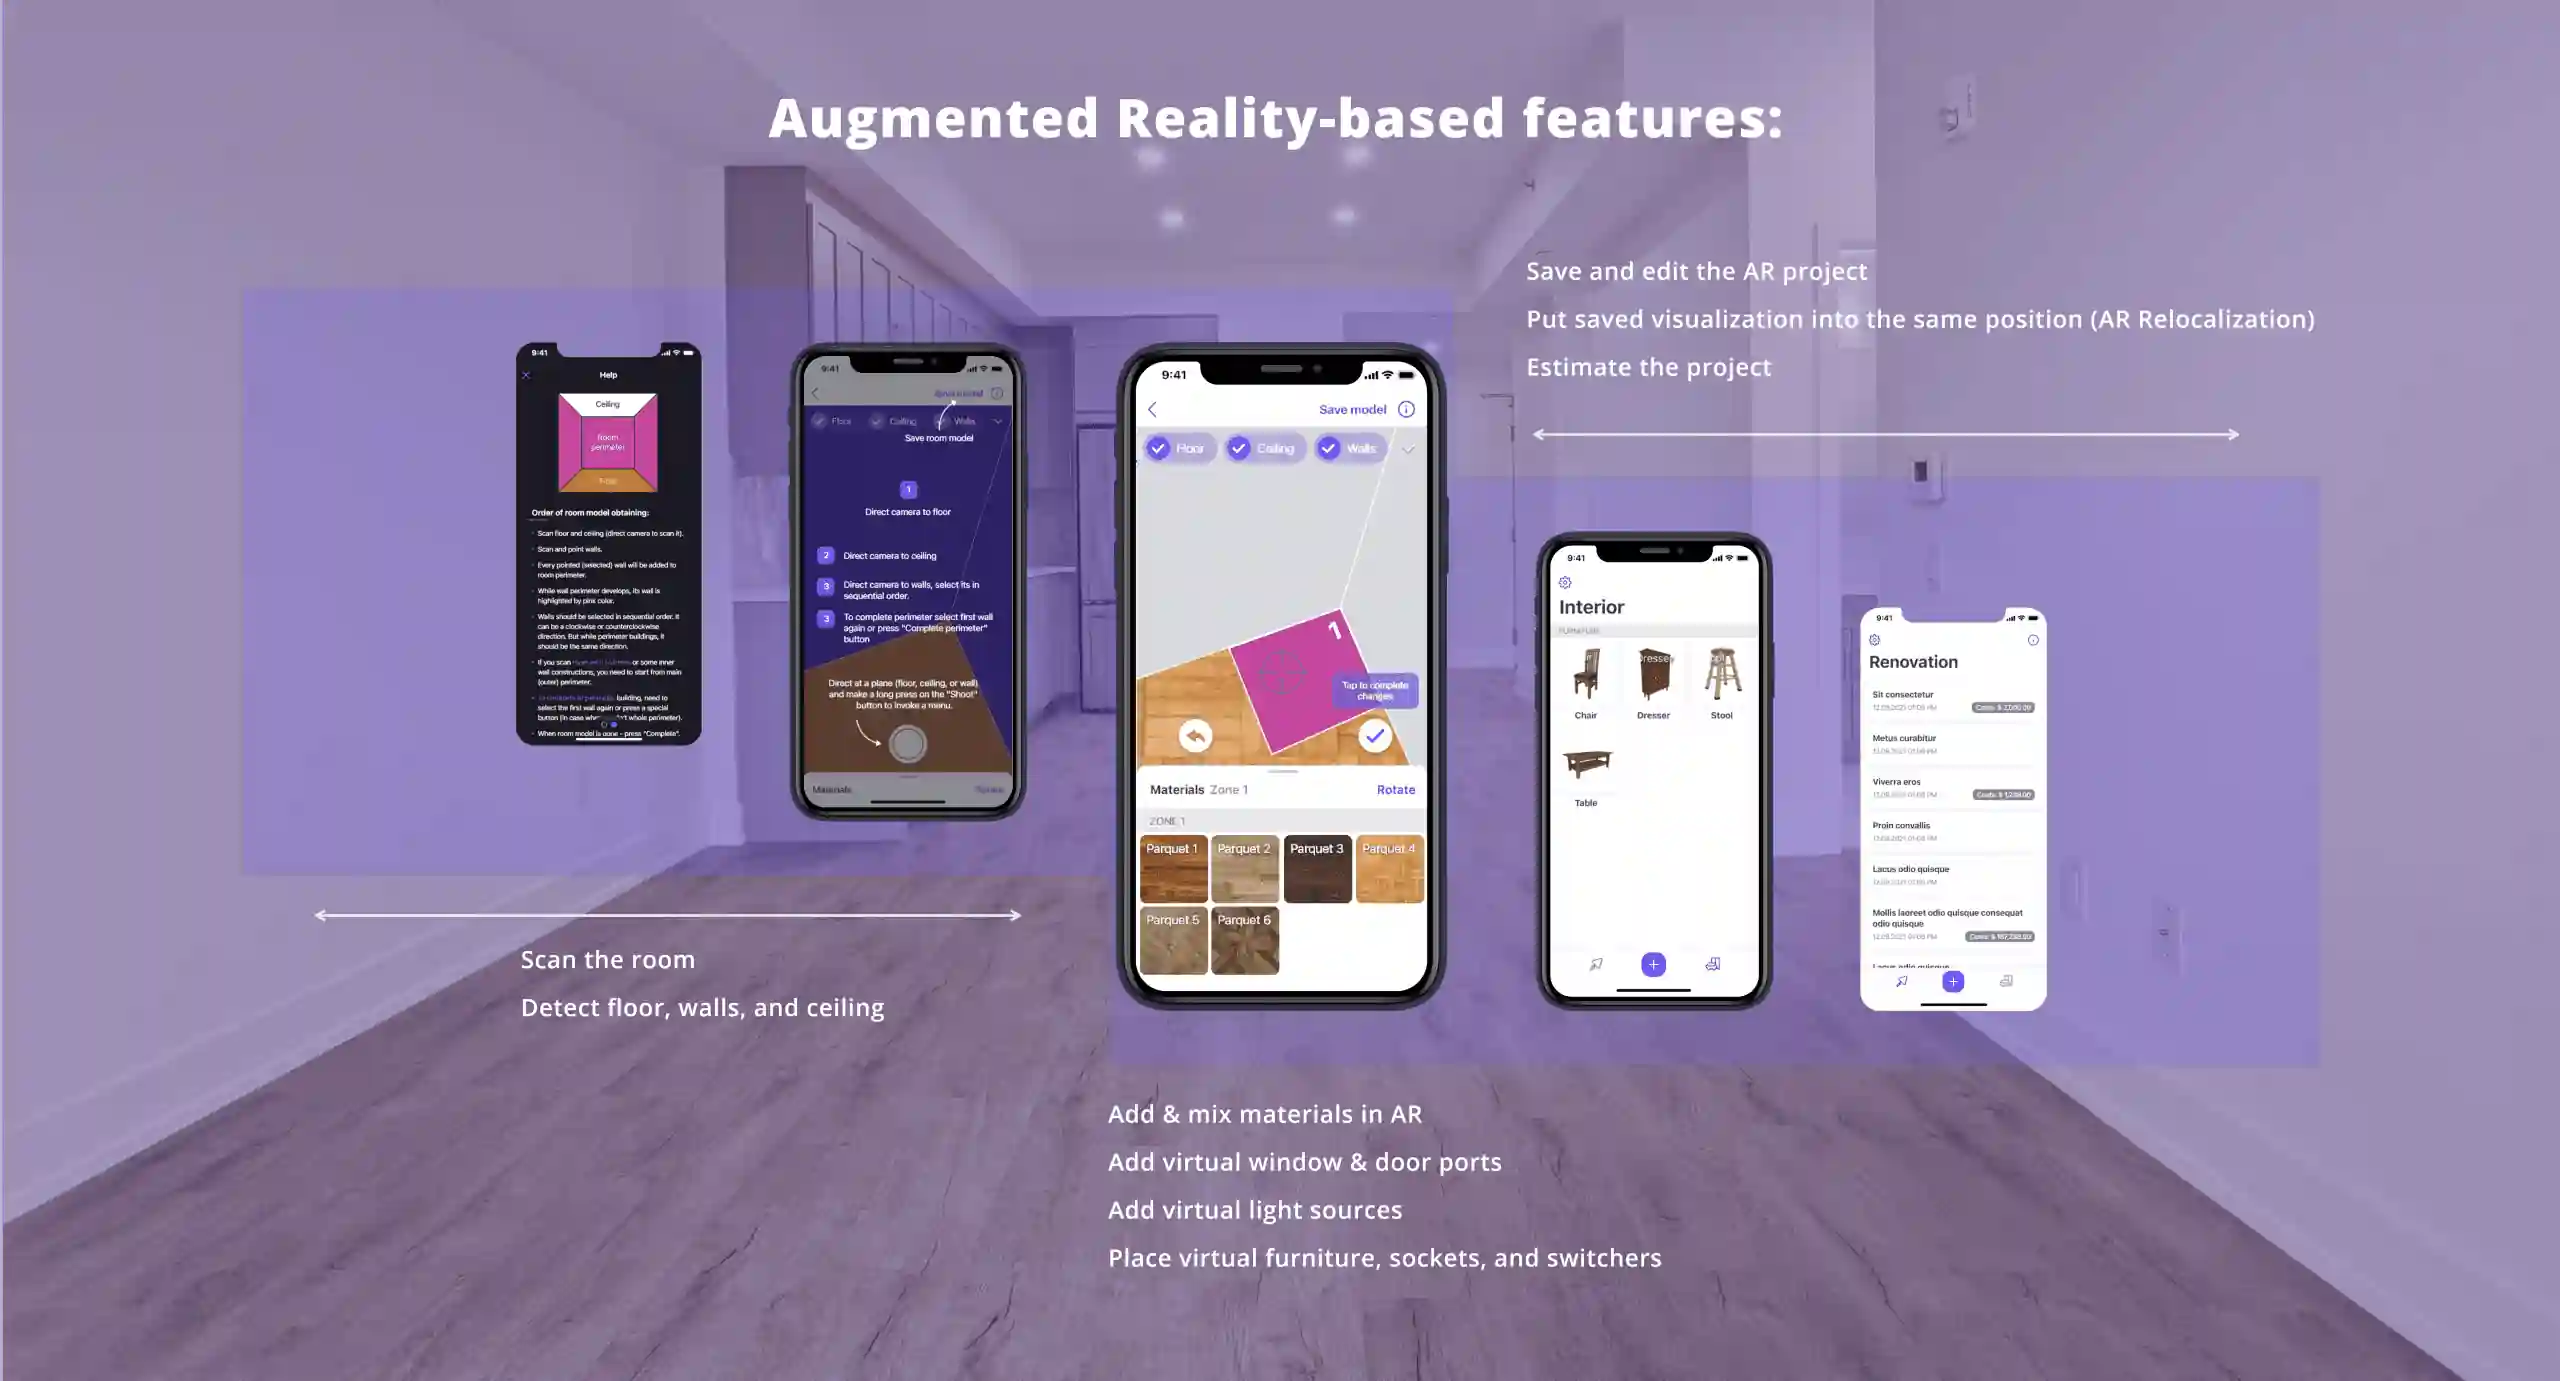
There are two parts to an AR measurement app: the AR feature and the app infrastructure. The AR feature involves the rendering and scene analysis process, and the app infrastructure encompasses all the UI, the backend, and other parts of the app. Depending on your application, you may need other components to add to this list.
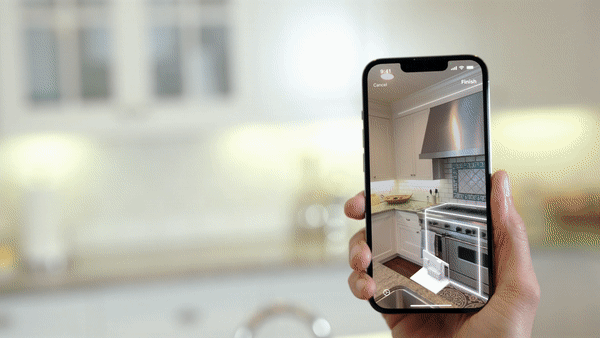
Floor Scanning and Floor Plan Creation
If you want to build an app that can create virtual floor plans with accurate dimensions, you’ll need to consider a few key details. The user will need to point their smartphone at floors, ceilings, and walls for processing. There are some frameworks available that can already help with this task. For example, ARKit’s RoomPlan tools are built specifically for AR room measurement applications. Using LiDAR scanning, RoomPlan allows applications to quickly get dimensions for a room with the following process:
- Open the app and select the room scanning feature.
- Aim the camera at the corner of the room.
- Move the device around to capture the room from different angles.
- The ARKit framework will use computer vision algorithms to analyze the images captured by the camera and create a 3D model of the room.
- The app will then use the 3D model to calculate the dimensions of the room, including the length, width, and height.
- The app may also allow you to add virtual objects, such as furniture or artwork, to the scene to see how they fit.
Since RoomPlan is based on LiDAR it has similar limitations that you should consider:
- Compatibility: RoomPlan uses LiDAR scanning, which is only available on newer iPhone Pro models and iPad Pros.
- Lighting: poor lighting or visibility conditions can affect the quality of the experience. This may not necessarily impact the software itself, but it can make it more difficult for the human user to see what they’re trying to scan, affecting the result.
- Reflective surfaces: mirrors can cause inaccuracies in RoomPlan outputs.
- Distance: objects that are too close or too far may not be accurately measured, leading to incomplete datasets.
- Resolution: Fine details, such as small objects or intricate textures, may be missed if they fall in between the grid points.
Adding Objects in AR
Scene understanding may be the most challenging part of any AR experience, but rendering virtual objects is relatively simple. However, the quality of these renderings will be heavily dependent on the quality of the scene’s measurements. In this step, you can visualize content like wallpaper, a 3D ruler, furniture, and other objects. Rulers can help users better understand the scale of what they see in their environment.
Since all these elements are displayed in 3D space, you’ll need to think carefully about UX and UI. Your objective is to ensure that the application is fun to use, visually appealing, and easy to understand and interact with.
Estimation Module
Providing calculations is the logical next step for measurement apps. Let’s say you’re selling wallpaper. If your app has successfully found the dimensions of the walls of a room, now you can generate an estimate. Here are some other examples:
- Renovation prices: based on floor or wall area
- Heating & cooling: based on area and/or volume
- Number of Wi-Fi routers: based on area
- Approximate time of robot cleaning: using the area of a room or rooms
There are several ways you can make your estimation model more effective, such as:
- Error correction: Small mistakes might happen, like if a user moves the device slightly during measurement. The app can use smoothing or filtering methods to fix this.
- Confidence intervals: This statistical method tells users how sure the app is about its results. It helps users understand and trust the data they collect.
- Calibration: Making sure the device is set up correctly can improve data accuracy. Encouraging users to calibrate their device before measuring will lead to better results.
- Error messages: These inform users about issues and how to fix them. For example, if there’s not enough light, the app can tell the user to turn on more lights.
These features enable the estimation module to provide more accurate information and help customers buy from you more confidently based on AR measurements.
Case Study: Building a Room Measuring App for Home Renovation
One of our clients is a United States-based construction and renovation firm. Their goal was to create an iOS-based solution that would enable their customers to visualize renovations in augmented reality. Once measured and visualized, an estimate would be provided to the customers for the final renovation cost. Customers also had the ability to choose materials and objects from the catalog, and these choices would influence the final estimate. This enabled customers to customize their renovation based on their budget and needs.
Some of the most important challenges we needed to overcome were:
- Providing accurate measurements
- Developing cost estimation features
- Giving users the opportunity to mix materials in ARl
Providing Accurate Measurements
Ensuring highly accurate measurements was essential because too much variance could mislead clients about price and materials. When Apple ARKit RoomPlan was not yet available, MobiDev’s team developed a custom solution where users point the camera at a room corner, select the walls, and let the app automatically detect the corners. Since RoomPlan’s release, the app has been updated for better accuracy and ease of use, successfully addressing challenges in providing precise measurements, cost estimation, and material customization.
Developing the Cost Estimation Feature
To provide users with a quote for the price of the materials and other objects selected, our team designed the app to calculate the area of walls and floors. It used the shoelace formula, also known as Gauss’s area formula, to subtract the area of windows and doors from the total area. This approach ensured that the cost estimation was as accurate as possible by considering the actual usable space.
In the next stages, we planned to integrate a database with a catalog of goods and prices through APIs. This integration would allow the app to correlate the calculated area with the prices of materials to provide rough estimates. By doing so, users would be able to get a more precise idea of the renovation costs, further enhancing their ability to plan and budget effectively.
Choosing Different Materials in AR
Users find it helpful to compare different materials at the same time to make a decision. It was challenging to allow users to compare more than one material, but we managed to create a custom solution to achieve this goal. Our team developed a special algorithm and used ARKit’s graph data structure. This allowed us to divide the floor area into as many zones as needed and assign different materials to each one.
We developed a tiling UI that allows users to mix materials on a grid in AR
After the idea for an app was born I started looking for someone to work with on the development. After numerous attempts with numerous developers, MobiDev were willing to take us on as a client and have expressed lots of faith in our idea and are working with us currently, providing many ideas and suggestions as we build on to the idea and making it a reality. MobiDev team has always been professional, punctual, and always willing to go the extra mile. After a lengthy break, we are continuing our work and look forward to continue the turning an idea Into reality! Truly giving breath to visionaries!

Full Case Study:
AR CONSULTING & DEVELOPMENT FOR HOME RENOVATION SOFTWARE PRODUCTMobiDev: AR Experience to Move Your Project Forward
MobiDev has been developing AR projects since ARKit’s launch in 2017. During that time, we’ve faced and overcome many challenges and have found ways of overcoming the limits of existing AR tools. We have experience implementing more than just 3D visualizations — we implement AR features into complex systems that can help you accomplish strategic business goals.
Now that you know how to move forward with your project, the next step is to get started! Talk to us about our augmented reality development services and see how we can help you achieve your vision for your AR measurement application.


