

Contents:
What is important when it comes to creating a mobile app or site? Of course, the idea behind the product. But if your potential customers won’t be able to use the app or the user experience would be unsatisfactory, the product is doomed to failure as well. Product owners should pay attention to mobile accessibility not only to be available for people of all kinds, including people with disabilities, but also to keep the application in line with current legislation norms and to offer another competitive advantage to their product. In 2022, 2387 website accessibility lawsuits were filed which means that mobile accessibility is more important than ever.
In this article, we are going to dive into the key principles of mobile accessibility, take a look at real-life examples, and offer practical tools and tips for testing the accessibility of Android and iOS applications.
Why Mobile Accessibility Testing Is Important for Product Owners
Earlier, we talked about web accessibility testing, however, the world is getting more and more mobile-first, with mobile internet traffic share in January 2023 estimated at 47% in North America and 49% in Europe.
For product owners, mobile accessibility testing can be important for several reasons:
- Inclusivity and equal access: Accessible mobile applications ensure that people with disabilities can fully use and benefit from the app’s functionalities. Mobile accessibility testing helps identify and address barriers that might prevent users with visual, hearing, motor, or cognitive impairments from accessing and using the app effectively. By conducting accessibility testing, developers can create an inclusive digital environment, promoting equal access for all users.
- Legal compliance: Many countries have laws and regulations that require digital content, including mobile applications, to be accessible to individuals with disabilities. Examples include the Americans with Disabilities Act (ADA) in the United States and the Web Content Accessibility Guidelines (WCAG) used globally. By performing mobile accessibility testing, Product owners can ensure their apps meet the necessary legal requirements, avoiding potential lawsuits and penalties.
- User experience and customer satisfaction: Accessibility benefits are not limited to users with disabilities; they can enhance the user experience for all users. By considering accessibility during the design and development of a mobile app, developers can improve the overall usability, navigation, and clarity of the app’s interface. This leads to better user satisfaction, increased engagement, and positive reviews, which all benefit the app’s reputation and success.
- Market reach and competitiveness: By ignoring accessibility, mobile app developers risk excluding a significant portion of potential users. According to the World Health Organization (WHO), around 15% of the world’s population has some form of disability. By ensuring mobile accessibility, developers can tap into this sizable user base and expand their market reach. Additionally, accessibility-conscious apps can attract users who value inclusive design and prefer apps that cater to a diverse range of needs.
- Brand reputation and social responsibility: Building accessible mobile apps demonstrates a commitment to social responsibility and inclusivity. Organizations that prioritize accessibility are viewed positively by users, advocacy groups, and communities. Such initiatives can enhance brand reputation, promote customer loyalty, and foster a sense of goodwill towards the product.

What are W3C and WAI?
When it comes to web and mobile accessibility, there are some international initiatives that take an important role in creating regulations and standards for products and websites. Let’s take a deeper look at them.
The World Wide Web Consortium (W3C) is a multinational consortium where organizations and the public work together to design web standards. W3C mainly directs its mission at the development of web standards and guidelines designed to promote long-term growth for the Web. W3C’s Web Accessibility Initiative (WAI) gathers individuals and organizations from around the world to create strategies, guidelines, and resources to help make the Web accessible to people with disabilities.
In this context, “mobile accessibility” means making websites and applications more accessible to people with disabilities while they are using mobile phones and other devices. WAI’s work in this area addresses accessibility issues for people using a broad range of devices to interact with the web, including
- phones and tablets
- digital TVs
- wearables such as smartwatches
- devices in car dashboards and airplane seatbacks
- devices in household appliances
- other “Internet of Things”
It handles a wide range of issues:
- different screen sizes
- different input modalities, including touchscreens, speech, gestures, and 3D touch enabled by pressure sensors
- the device is used in different environments, such as bright sunlight
- and more
Who Needs an Accessible Mobile App?
A large percentage of people who use mobile apps and websites have disabilities. And when they experience accessibility issues while using the product in the way they were hoping, they can just delete it, leading to damage to the brand reputation of the product. However, the story might not end at that point, as it can also lead to legal consequences. The number of web accessibility lawsuits continues to grow every year with some companies having to deal with multiple cases in one year. Consumer Goods, Services & Retail maintain the top spot as the most-targeted industry group in 2022, registering 423 more lawsuits than in 2021 and accounting for 58% of the year’s total cases.
Making your app accessible is all about making your app as user-friendly as possible to users that have different needs. The following four groups of people require an accessible mobile app:
- People with cognitive impairments. This includes conditions such as ADD, dyslexia, and Alzheimer’s. These users are either easily distracted, or cannot follow too many different screens or topics.
- Users with visual impairments. This includes color blindness as well as complete blindness. People with visual impairment rely on contrast and visual alternatives to process content.
- People with auditory impairments. Anyone with partial or complete loss of hearing won’t be able to process all app content if it’s inaccessible – auditory alternatives are required.
- Users with mobility impairments. Users with mild or severe mobility impairment won’t be able to move dexterously or tap with purpose when using an app.
However, products that are compliant with mobile accessibility standards are not necessarily usable for people with disabilities. Inclusive design isn’t about designing for the minority — it’s about ensuring that the majority of your users can use your product.
Regulations that Determine Mobile App Accessibility
The regulations that determine whether and which mobile applications need to be accessible comes from several different official acts and legal documents, the most important of which is the ADA or Americans with Disabilities Act.
There is also the WCAG (The Web Content Accessibility Guidelines) that are developed by the World Wide Web Consortium and it’s what most of today’s website accessibility standards are based on, including those mentioned in the ADA.
In addition to this, there’s the Twenty-First Century Communications and Video Accessibility Act (CVAA), which offers telecommunication protection to those with disabilities. It’s the CVAA that requires advanced communications to be accessible.
When it comes to Europe, starting from June 2025, the European Accessibility Act (EAA) will be enforced within the European Union member states. This directive extends its scope to include for example e-commerce platforms, including webshops. As of 28 June 2025, companies must ensure that the newly marketed products and services covered by the Act are accessible.
What WCAG 2.2 Means for Mobile Accessibility
The WCAG features a wide array of recommendations for making web content more accessible. When it comes to native mobile accessibility, there is no official standard for such mobile apps, However, product owners can use WCAG to understand how to make app content more accessible.
WCAG categorizes each guideline into one of three levels based on the effect they have on the accessibility experience – A, AA, or AAA. Achieving compliance with the AAA guidelines will provide the most accessible experience to the most groups of users, and also is beneficial to the visual design of the application. Generally speaking, attempting to meet the level A criteria is a step in the good direction for making sure a product delivers an acceptable customer experience for most users.
The W3C is working on version 2.2 of WCAG as this document was published by the Accessibility Guidelines Working Group as a Candidate Recommendation Draft using the Recommendation track. WCAG 2.2 adds a few new success criteria expanding requirements for users with low vision, cognitive impairments, and limited fine motor skills.
How to Perform Mobile Accessibility Testing
Accessibility testing should confirm that the website or application achieves at least a WCAG 2.1 level AA. Verifying that a website or application meets the success criteria is an excellent way to deliver better digital services for all users.
Like any QA test, accessibility tests are also sensitive to test coverage. Using OS analysis tools is a great way to help QA teams to check a website or application at the programming level to enhance test coverage.
Besides this, it is essential to consider testing mobile websites and applications across multiple devices. To adequately test a website’s or application’s accessibility, it’s necessary to use at least 4 or 5 devices:
- iPhone with the latest iOS version
- Smartphone with the latest Android OS version
- iPad with the latest iOS version
- 1 or 2 other combinations: Android tablet or smartphone with the latest or second latest OS version.
Although a part of accessibility tests can be automated, manual testing is a better fit for an extensive range of accessibility tests, as it allows the tester to check a website or application using real devices and achieve a better perspective on its level of accessibility. It is also possible to extend accessibility testing by using accessibility tools and features provided by mobile operating systems. Apple’s iOS and Google’s Android, the most popular operating systems in Europe and North America, both have these types of features.
Mobile accessibility testing should be conducted regularly, based on the app’s development and release cycle. It’s best practice to test during development, before every release, after major changes and updates, and once in 6 months as a general check-up.
Mobile Accessibility Testing Checklist
Each operating system has different assistive features for the following disability groups:
- Vision — for people who are blind or have trouble viewing the screen.
- Hearing — for people who are deaf or have trouble hearing.
- Cognitive and learning — for people with cognitive and learning disabilities.
- Physical and motor skills — for people with physical disabilities.
There is a wide range of possible versions of Mobile Accessibility Testing checklists. However, all of them could be described in these ten key points:
- User Interaction
- Navigation
- Notifications
- Form Labels & Validation
- Toggle Button
- Tables & Accordion
- Text & Color Contrast
- Images
- Audio & Video
- Animation & Motion
To see how it looks in practice, you can take a look at one of the examples of the WCAG 2.0 AA Checklist here.
Mobile Accessibility Testing Approaches and Tools
When it comes to mobile accessibility testing, there are the following common approaches:
- Manual testing: interacting with an app using iOS or Android accessibility services.
- Testing with analysis tools: using tools to find weak sides of the app and check opportunities to improve your app’s accessibility.
- Automated testing: accessibility testing with the help of automation tools.
- User testing: getting feedback from real people who interact with your app.
There are a lot of mobile accessibility testing techniques and tools, from simple to advanced, such as:
- Test for text enlargement, magnification, color contrast, and zoom conformance via built-in iOS and Android Accessibility settings. This tool will help you to see if your application readily responds to these OS preferences, and if it does, how the interface changes. For example, you can find text that appears to be cut off since some focus elements are not visible when using the screen reader and magnification, and text can appear with poor contrast even in inverted mode.
- Use Siri, Switch Control, and the new Voice Control feature in iOS to test for accessibility for users who prefer alternate input methods or speech commands, and check how Google Assistant, Switch Access, and Voice Access work on Android.
- Test for screen reader compatibility with VoiceOver (built-in screen reader for iOS) and Talkback (built-in screen reader for Android). Pay attention to the text being read in the incorrect order, unknown/incorrect labels for elements, headings that are missed, and new content that appears on screen because of a user action that is not announced.
- Use the Google Accessibility Scanner to check for missing item labels, duplicate item descriptions, touch target size, unsupported item types, text and image contrast, and more.
Although automation catches 40% of the bugs, it’s always necessary to perform manual accessibility audits to make sure that applications are inclusively designed.
Mobile Accessibility Testing for Android Apps
Mobile accessibility testing for Android apps involves evaluating and ensuring that an Android app is accessible to individuals with disabilities. It involves assessing the app’s usability and compatibility with assistive technologies and accessibility features available on Android devices. The primary objective is to identify and address any barriers or challenges that may prevent users with disabilities from effectively using the app.
Manual testing tools
Manual testing helps to experience your application from the user’s side. Android Accessibility Service objects change the way your app’s content is presented to the user and how the user interacts with the content. Android accessibility features can be enabled on Android devices through Settings → Accessibility. Let’s dive deeper to check the most useful features.
TalkBack
TalkBack is a built-in Android screen reader that can read everything on the screen. In apps, this includes all buttons, images, form elements, static text, etc. In the mobile browser, this should include all web content (text, alternatives for images, links, form fields, tables, etc.). TalkBack is used by blind and low-vision users, and also by users with some cognitive or learning difficulties. It’s also possible to enable more advanced settings like Text-to-speech, Vibration Feedback, and Spoken assistance.
In TalkBack, there are two main ways to navigate:
- Linear navigation: by swiping right or left to navigate through screen elements in a sequence. Then users doubletap anywhere to select.
- Explore by touch: by moving a finger over the screen to hear what’s under a finger, then doubletap anywhere to select.
To check the app for accessibility with TalkBack, you need to follow these steps:
- Open your app.
- Swipe through each element in a sequence.
- Navigate to see what’s happening.
While navigating, consider the following questions:
- Is the spoken feedback for each element relevant to its content or purpose?
- Are announcements clear and easy to understand, or are they needlessly verbose?
- Are you able to complete the key workflows easily?
- Are you able to navigate to every element by swiping?
- When temporary messages or alerts appear, are they read aloud?
For more details and information, explore TalkBack user documentation.
In addition to this, you can explore TalkBack developer settings.
To view or change developer settings, follow these steps:
- Open your device’s Settings app.
- Navigate to Accessibility and select TalkBack.
- Select Settings > Advanced settings > Developer settings:
- Log output level: Select VERBOSE.
- Display speech output: Turn on this setting to view TalkBack speech output on the screen.
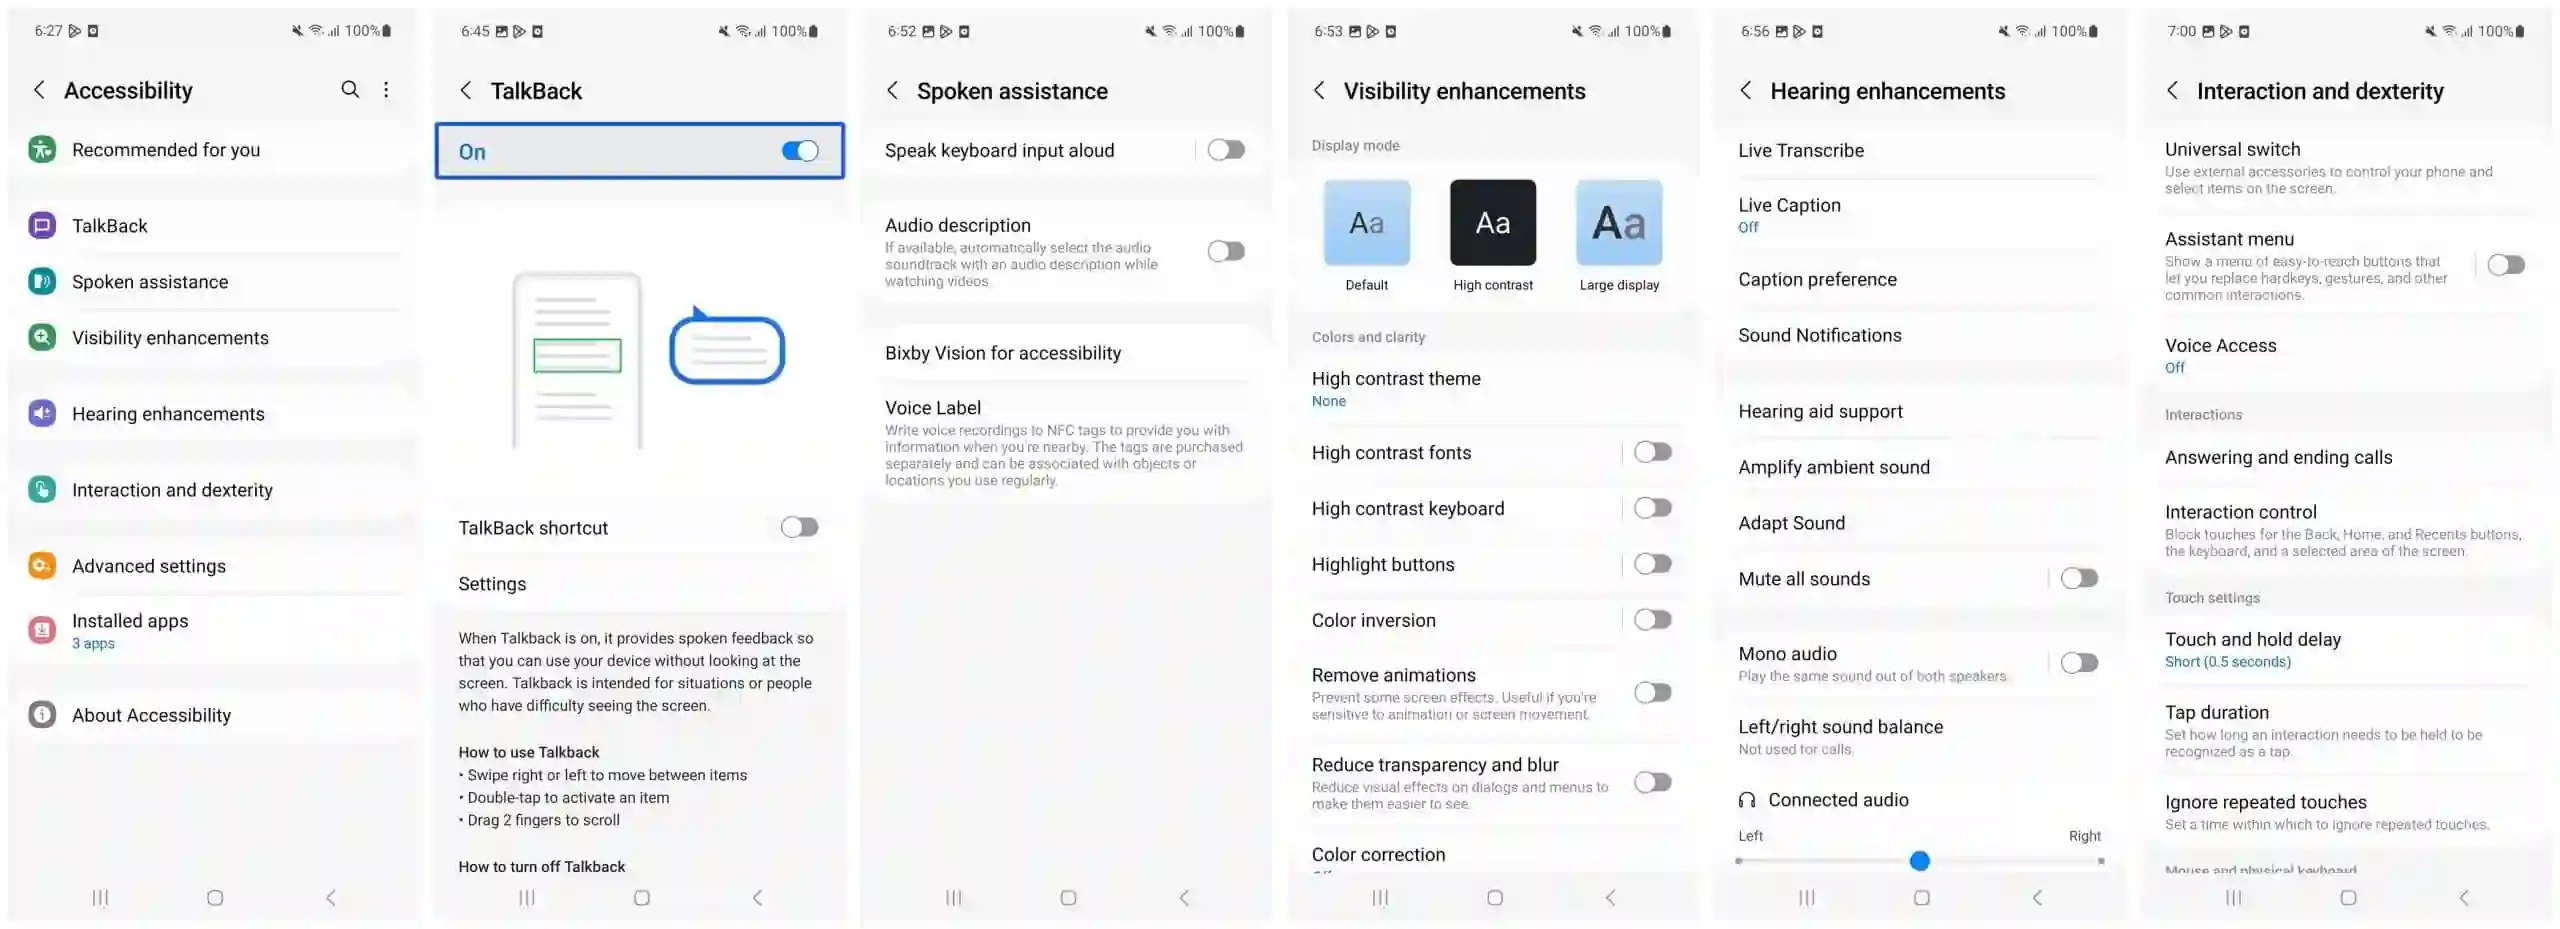
Android provides several additional approaches for testing your app’s accessibility.
- Visibility enhancements: To make fonts clear and comfortable to navigate, enable Negative colors, eliminate animations, and more.
- Hearing enhancements: It’s possible to use sound detectors to get alerts when the phone detects the doorbell or a baby crying or to mute all sounds on the phone if it’s necessary.
- Interaction and dexterity: It’s possible to adjust or replace touch interactions and other controls. Some features include a Universal switch to control your phone with custom switches, and an Assistant menu to turn on functions that help users with reduced dexterity.
Analysis tools
Using analysis tools can discover additional opportunities to enhance accessibility that might be missed during the stage of manual testing.
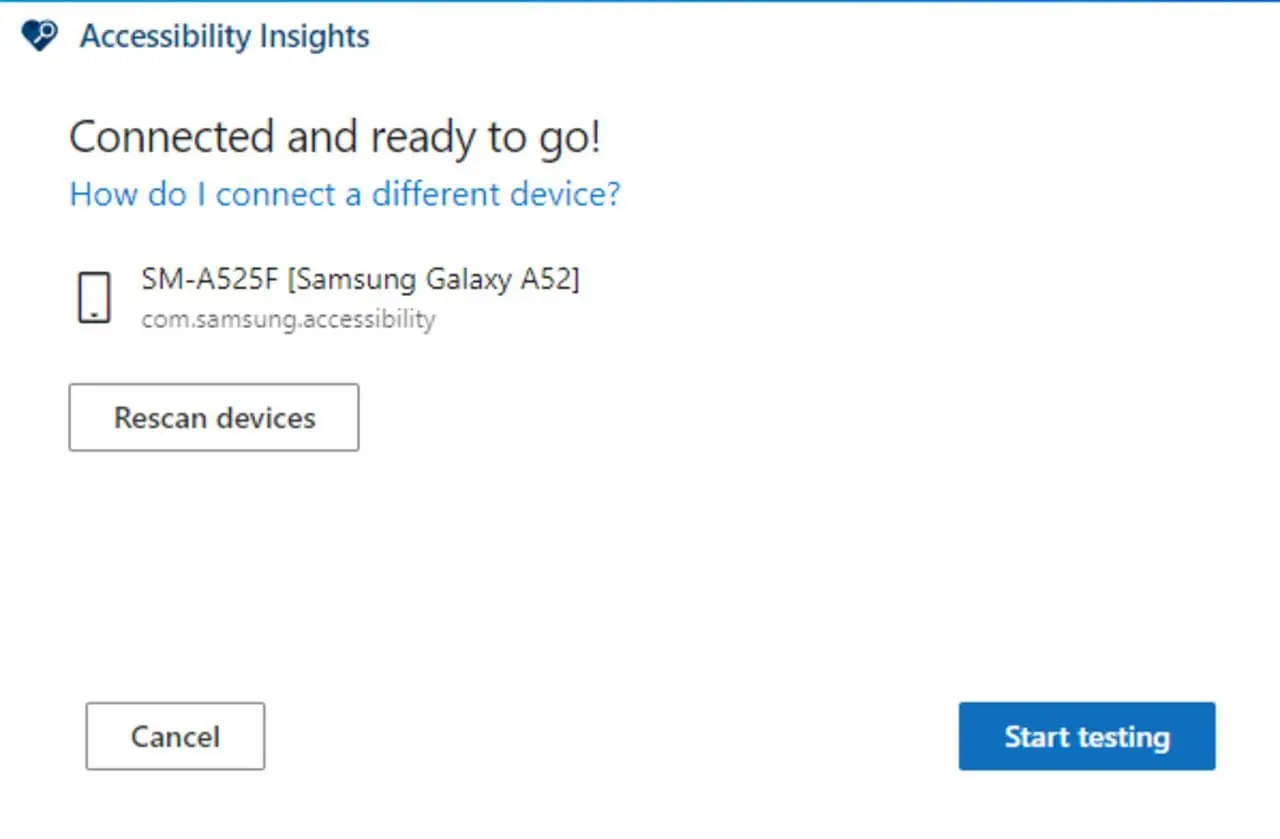
1. Accessibility Insights for Android
Accessibility Insights for Android is a free, open-source tool that helps developers find and fix accessibility issues in Android apps. The tool runs on Windows, Mac, and Linux. You can test apps on a hardware device or on an Android Virtual Device.
Get started by watching a video:
- Setup and Installation for Accessibility Insights for Android
- Introduction to Accessibility Insights for Android
Accessibility Insights is a free, open-source, and effective tool for detecting accessibility issues, so we can recommend it.
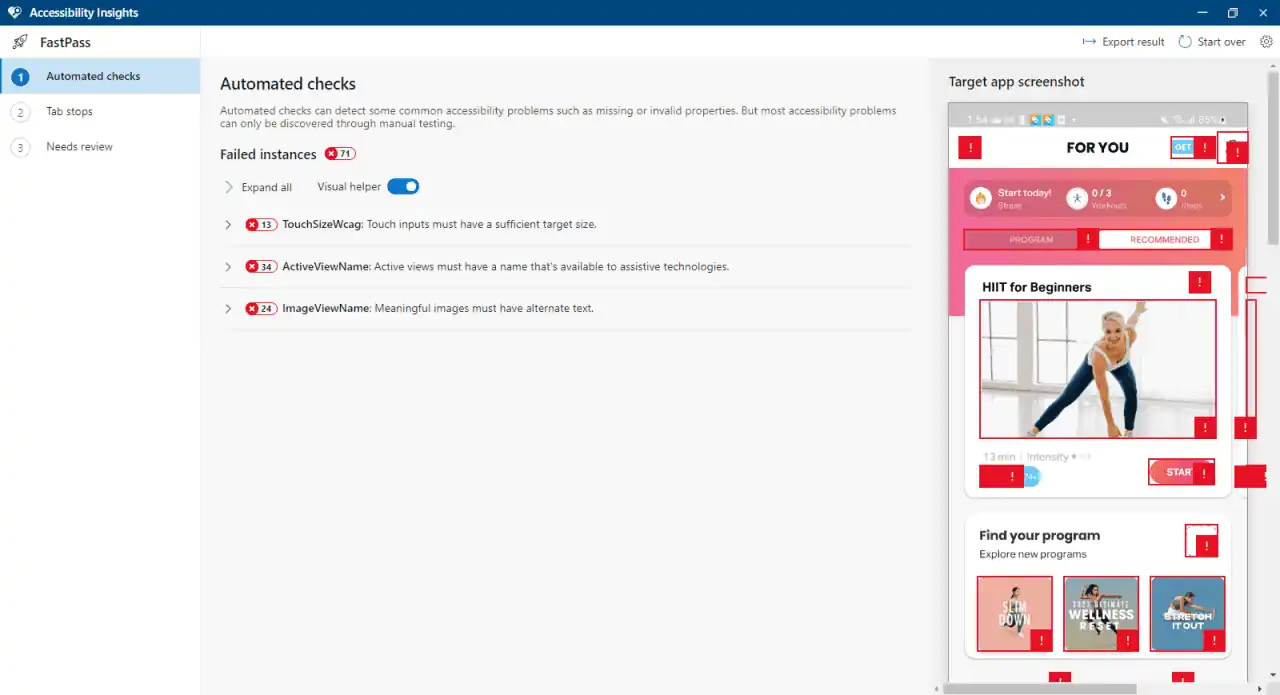
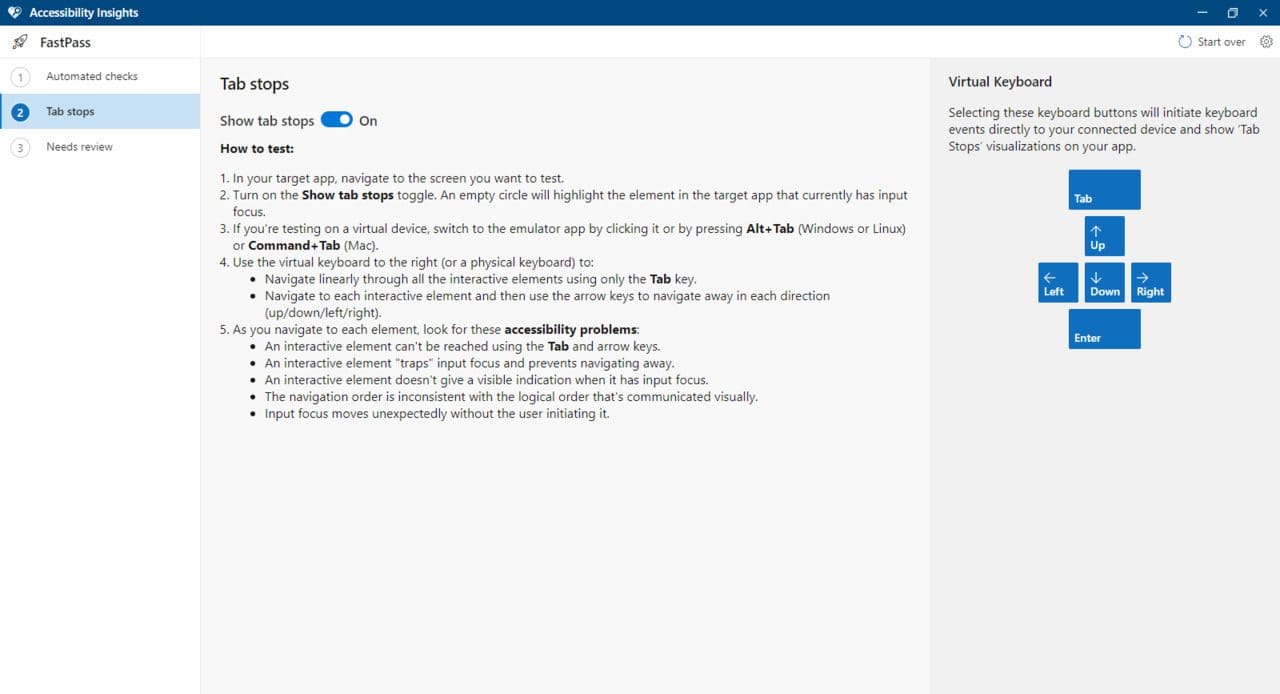
FastPass in Accessibility Insights for Android
FastPass is a lightweight, two-step process that helps testers identify common, high-impact accessibility issues in a few minutes.
- Automated checks – the tool automatically checks for several programmatically-detectable accessibility issues, such as low contrast, missing accessible names, or inadequate touch target sizes.
- Manual test for tab stops – the tool provides clear instructions and a visual helper that makes it easy to identify critical accessibility issues related to keyboard access, such as missing tab stops, keyboard traps, and incorrect tab order.
We recommend running a FastPass before every check-in of UI code. Completing a FastPass requires you to use standard keyboard commands and to visually identify interactive interface elements. Automated checks can detect some common accessibility problems such as missing or invalid properties. But most accessibility problems can only be discovered through manual testing.
The app allows:
- Run automated checks after setting up Accessibility Insights for Android on your computer and test device.
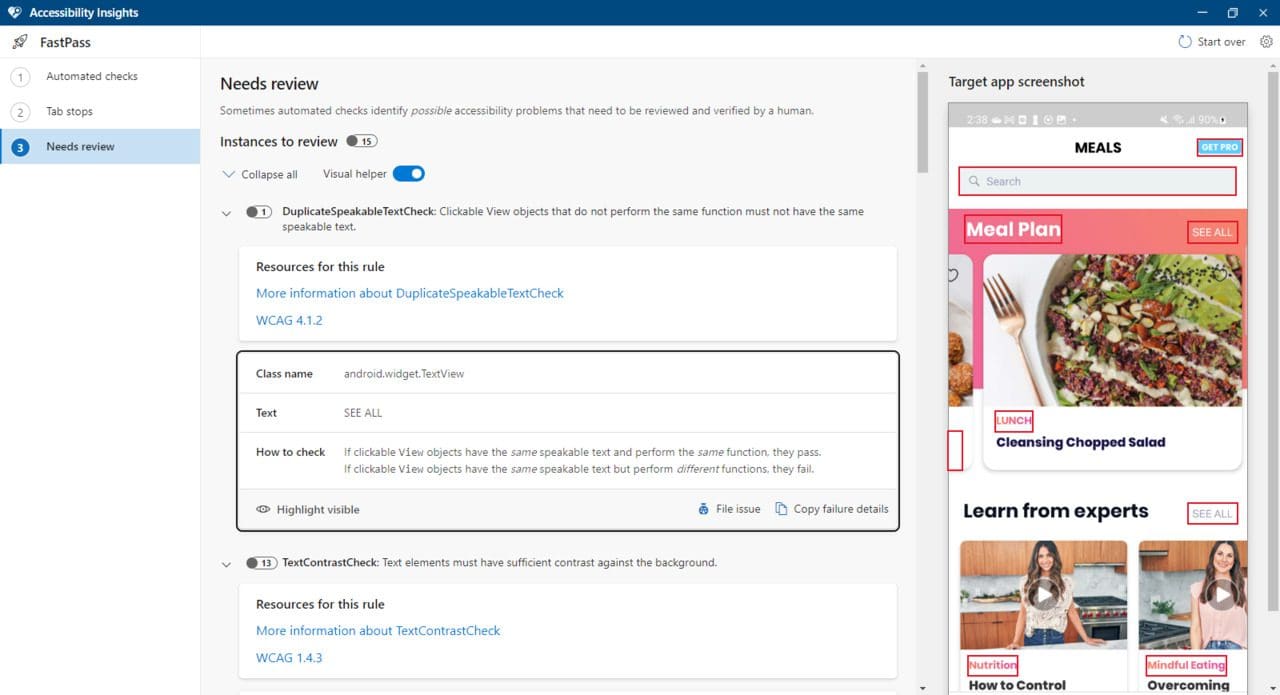
- See the Results – When the automated checks have been completed, results are displayed in a new window.
- Show information about failed instances according to Rules.
- Use the Visual helper that allows you to quickly show or hide failure instance highlighting in the screenshot.
- Use the manual test for tab stops. The Tab stops test can be completed on a virtual or physical device using the virtual keyboard built into Accessibility Insights for Android.
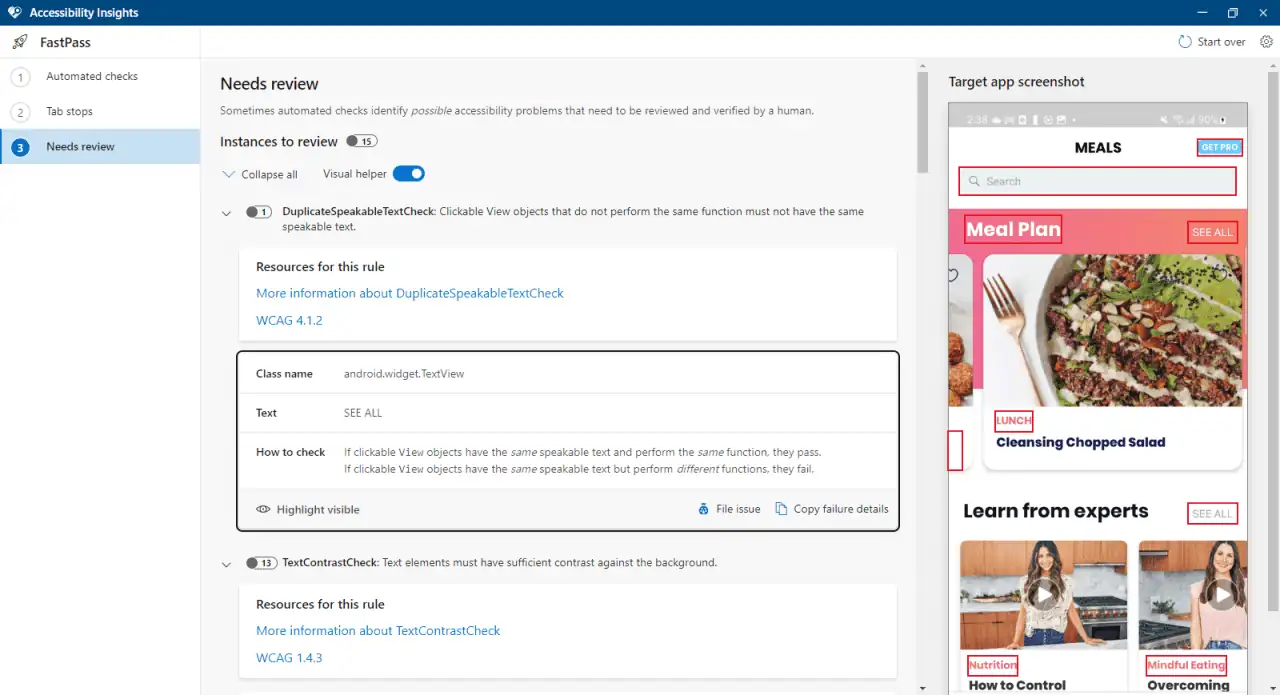
- Evaluate instances that need review. Sometimes an automated check encounters an element coded in a way that can’t be evaluated automatically. For example, the color-contrast rule can’t determine the contrast ratio of text that’s superimposed on an image or gradient. Such instances need to be reviewed by a human to determine whether they pass or fail.
- File an issue.
- Share a detailed report of the automated checks with the Export result option.
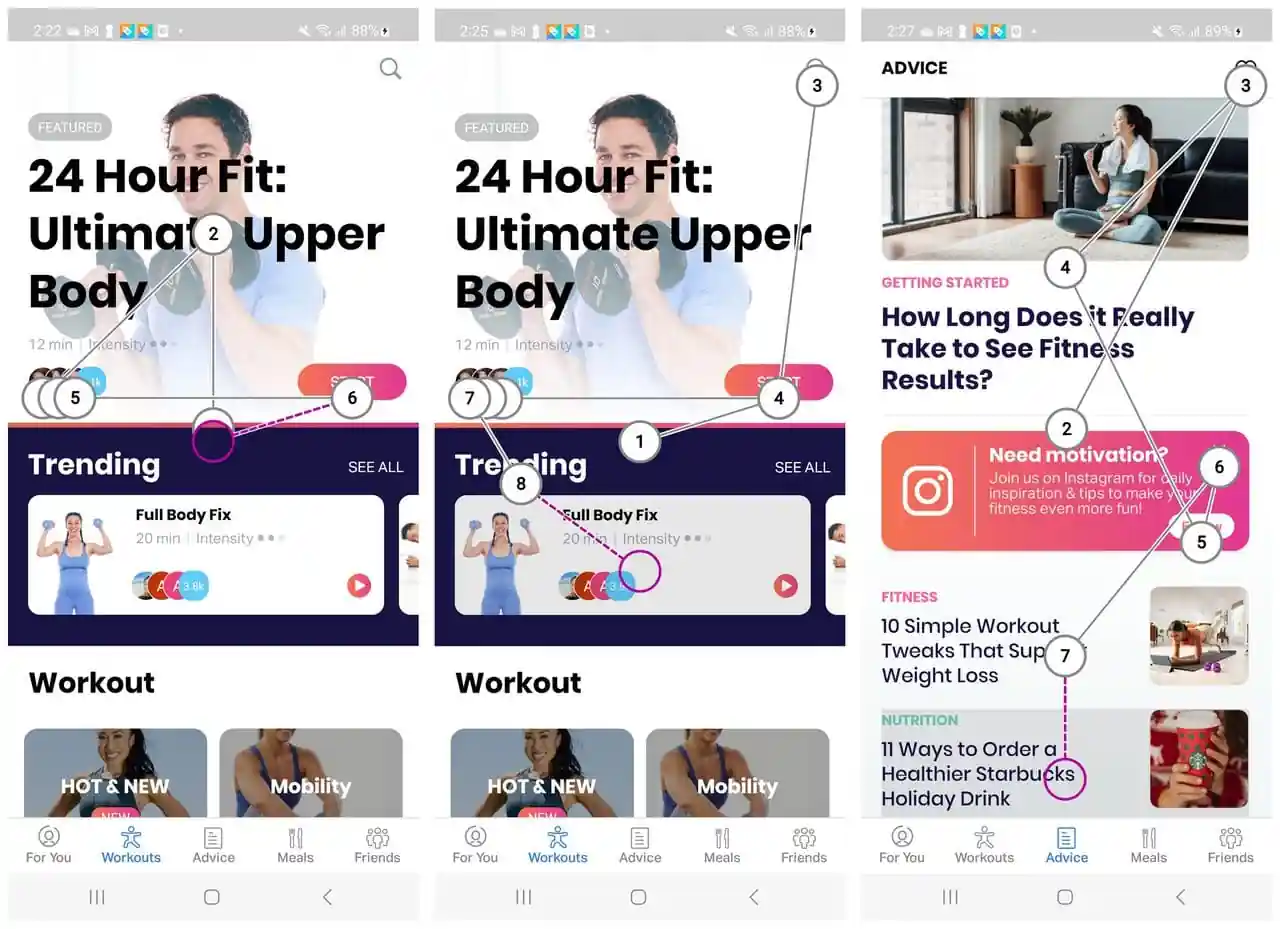
Here is how the checking process might look while using Accessibility Insights for Android.
The Tab stops shows the way how the main elements of the screen will be presented for users.
At the end, it is possible to get the Results report to see what requires improvement.
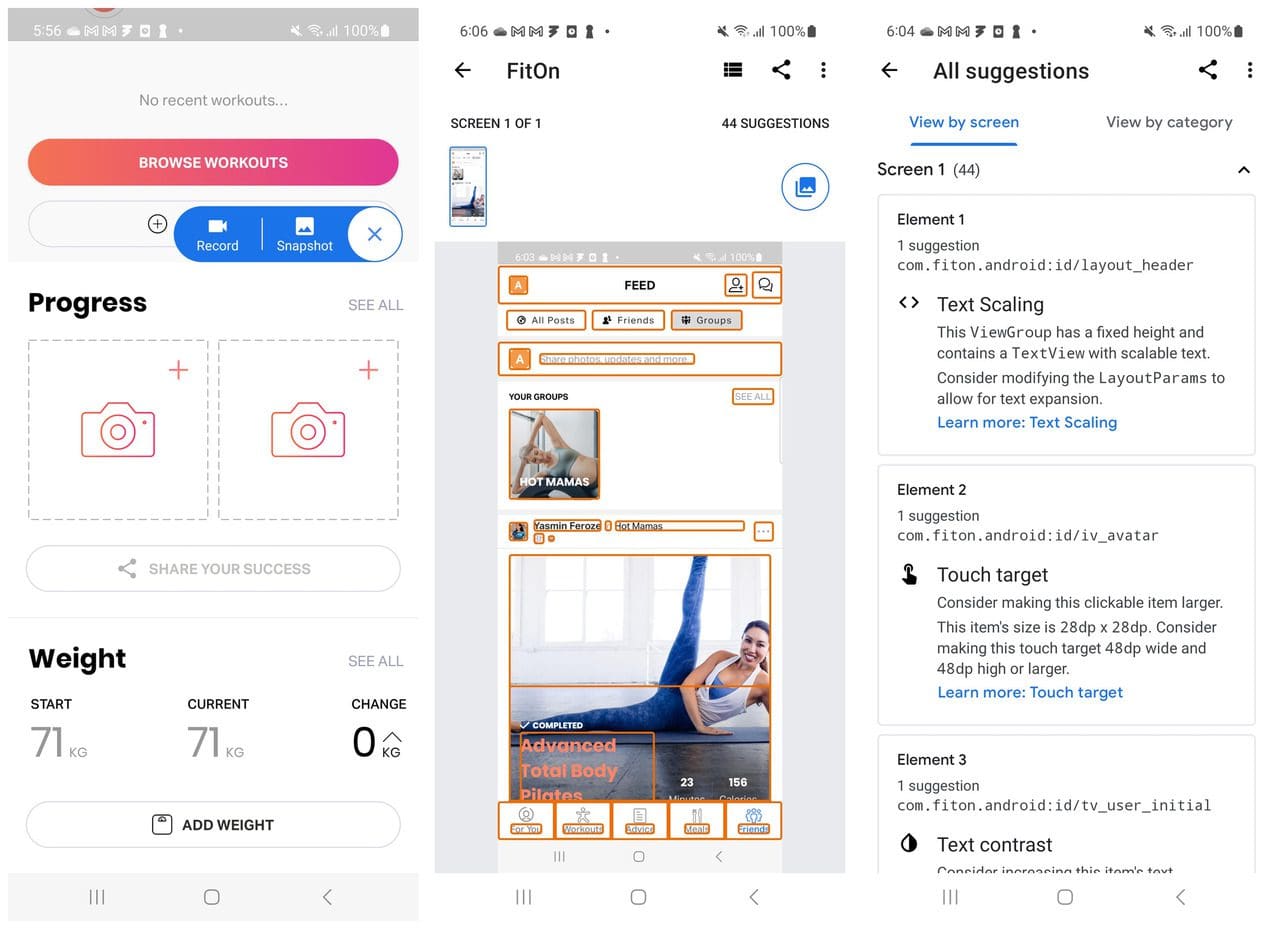
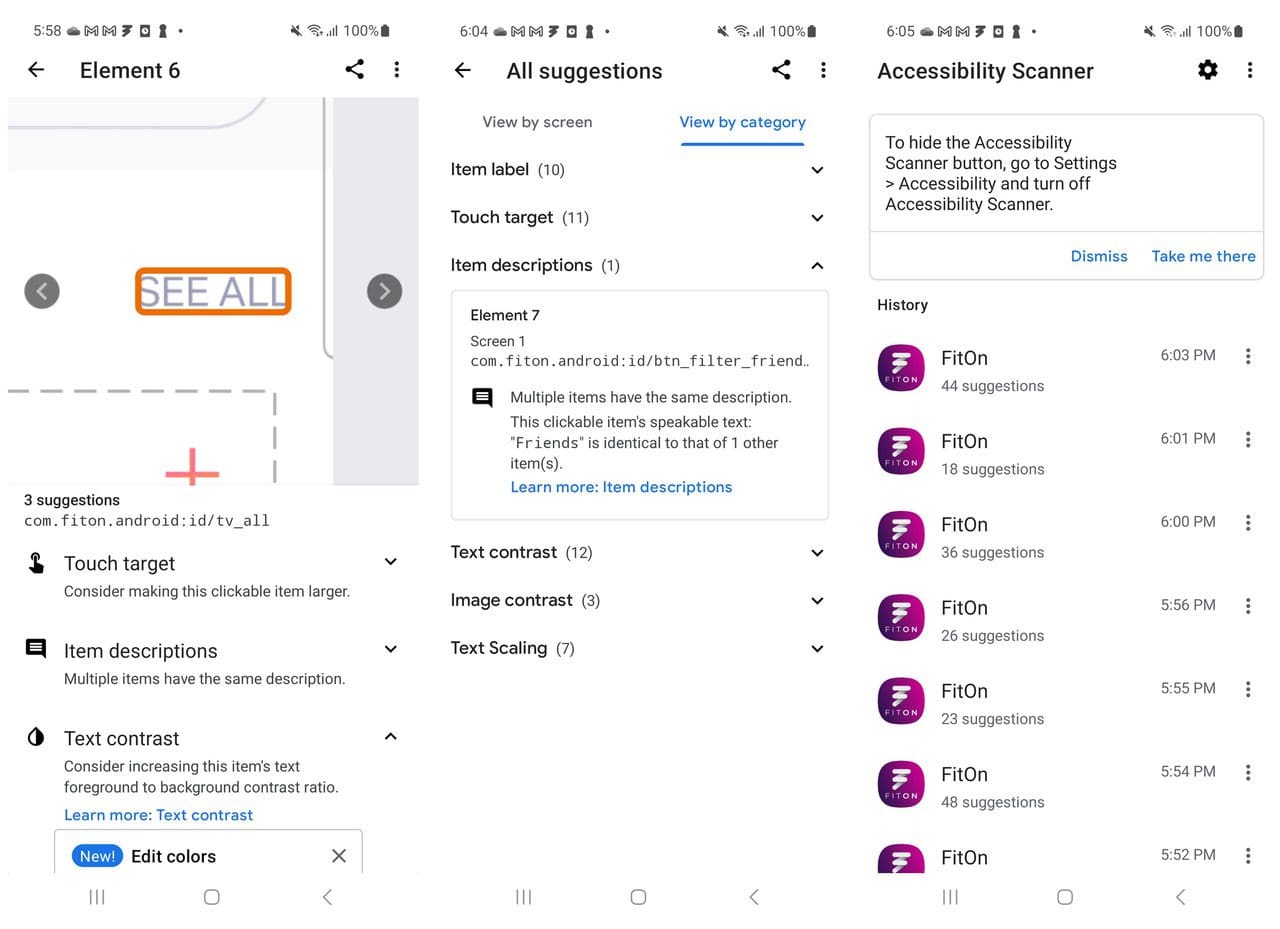
2. Accessibility Scanner
Accessibility Scanner is a tool that scans an app’s user interface to provide recommendations on how to improve the accessibility of the app. Accessibility Scanner enables anyone, not just developers, to quickly and easily identify a range of common accessibility improvements; for instance, enlarging small touch targets, increasing contrast for text and images, and providing content descriptions for unlabelled graphical elements.
Enhancing the accessibility of your app may allow you to reach a larger audience and provide a more inclusive experience, especially for users with disabilities. This often leads to improved user satisfaction, app ratings, and user retention.
The improvements suggested by Accessibility Scanner can be easily shared with members of your development team to determine how they can be incorporated into the app.
To begin using Accessibility Scanner:
• Open the app and follow the prompts to turn on the Accessibility Scanner service.
• Navigate to the app you wish to scan and tap the floating Accessibility Scanner button.
• Choose to perform a single scan, or record an entire user journey across multiple interfaces.
For more detailed instructions, follow this getting started guide: g.co/android/accessibility-scanner-help
Check out this short video to learn more about how Scanner works.
g.co/android/accessibility-scanner-video
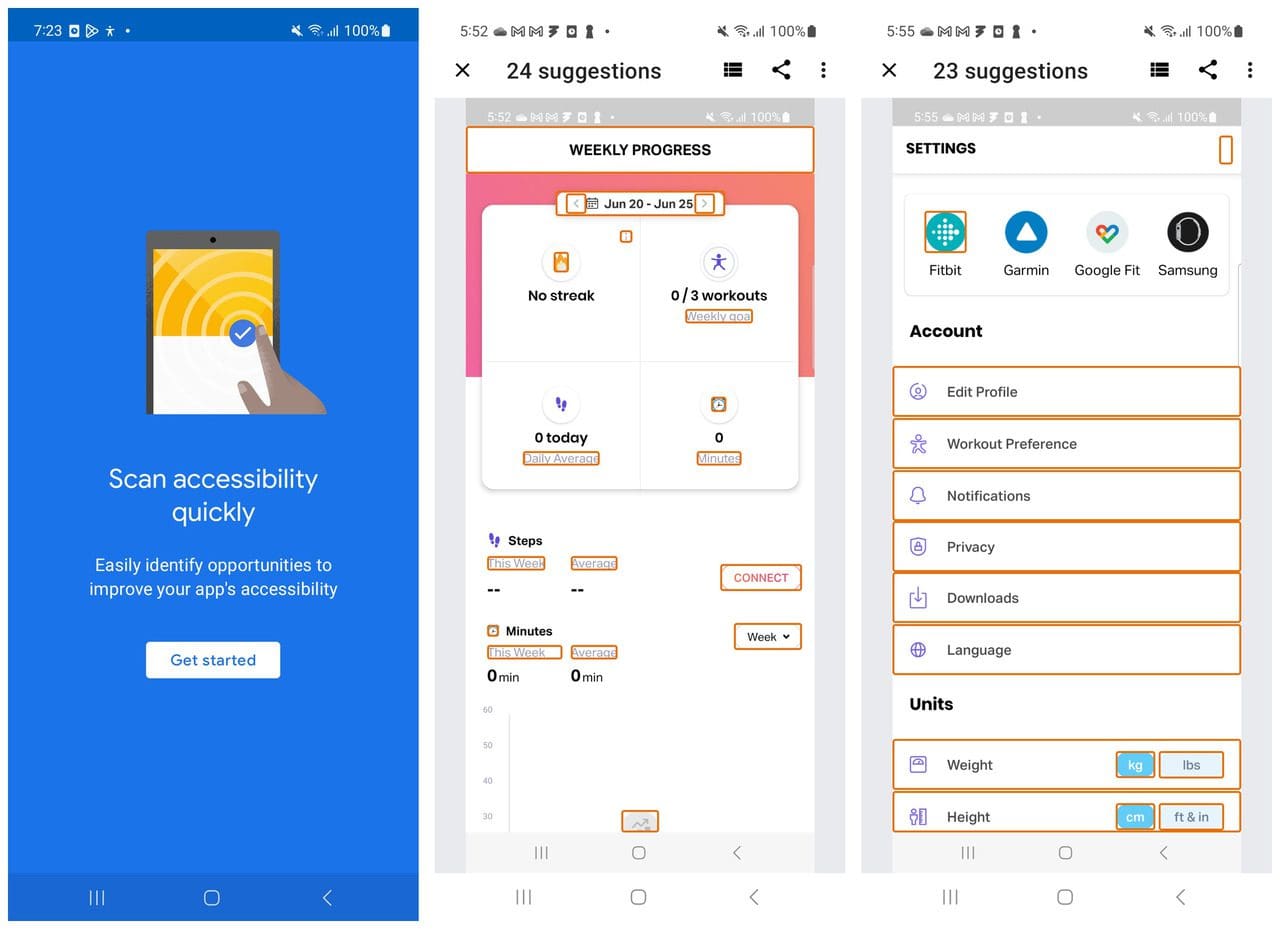
When you design and develop an Android app, Accessibility Scanner can help you improve your app for users. Accessibility Scanner scans your screen and provides suggestions to improve the accessibility of your app, based on:
- Content labels
- Touch target size
- Clickable items
- Text and image contrast
Mobile Accessibility Testing for iOS
The iPhone devices offer many accessibility features to support your vision, physical and motor, hearing, and learning needs. People use Apple’s accessibility features to personalize how they interact with their devices in ways that work for them. An accessible app supports accessibility personalizations by design and gives everyone a great user experience, regardless of their capabilities or how they use their devices.
Manual testing
When navigating the app with accessibility features turned on, it’s possible to gain an understanding of the challenges of interacting with a device in different ways. You also discover places where your app might fail to deliver a great user experience.
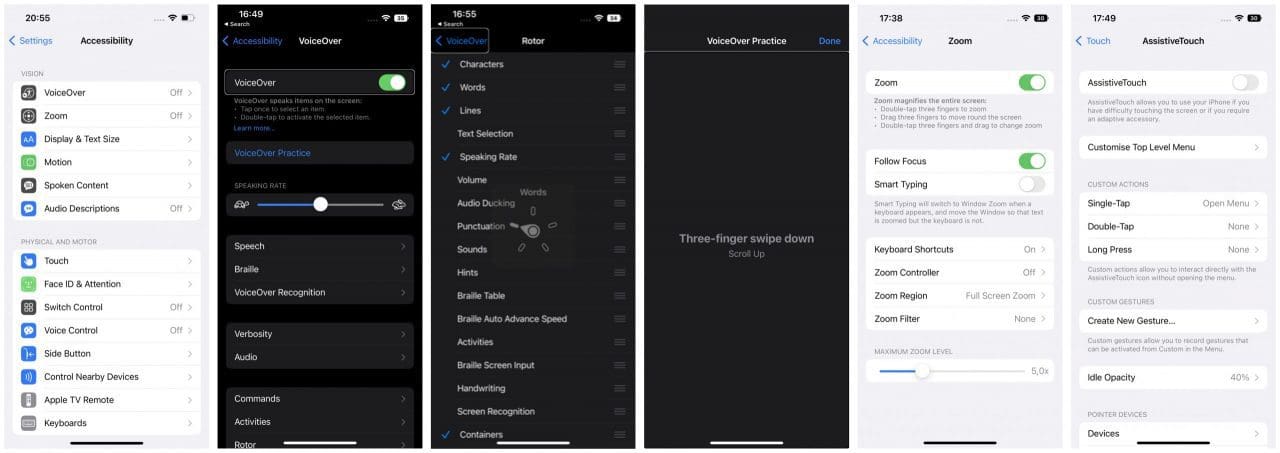
For each critical user flow in your app, turn on an accessibility feature, such as VoiceOver, Reduce Motion, or Large Text Size, and make sure that you can complete every task in the flow without difficulty. After you fix the problems you uncover, turn on a different accessibility feature and run through the user flow again. Before diving straight into making your app more accessible, take some time to get familiar with the accessibility settings that iOS provides. Accessibility features can be enabled through Settings → Accessibility.
There are the following feature types:
- Vision
- Physical and motor
- Hearing
- General
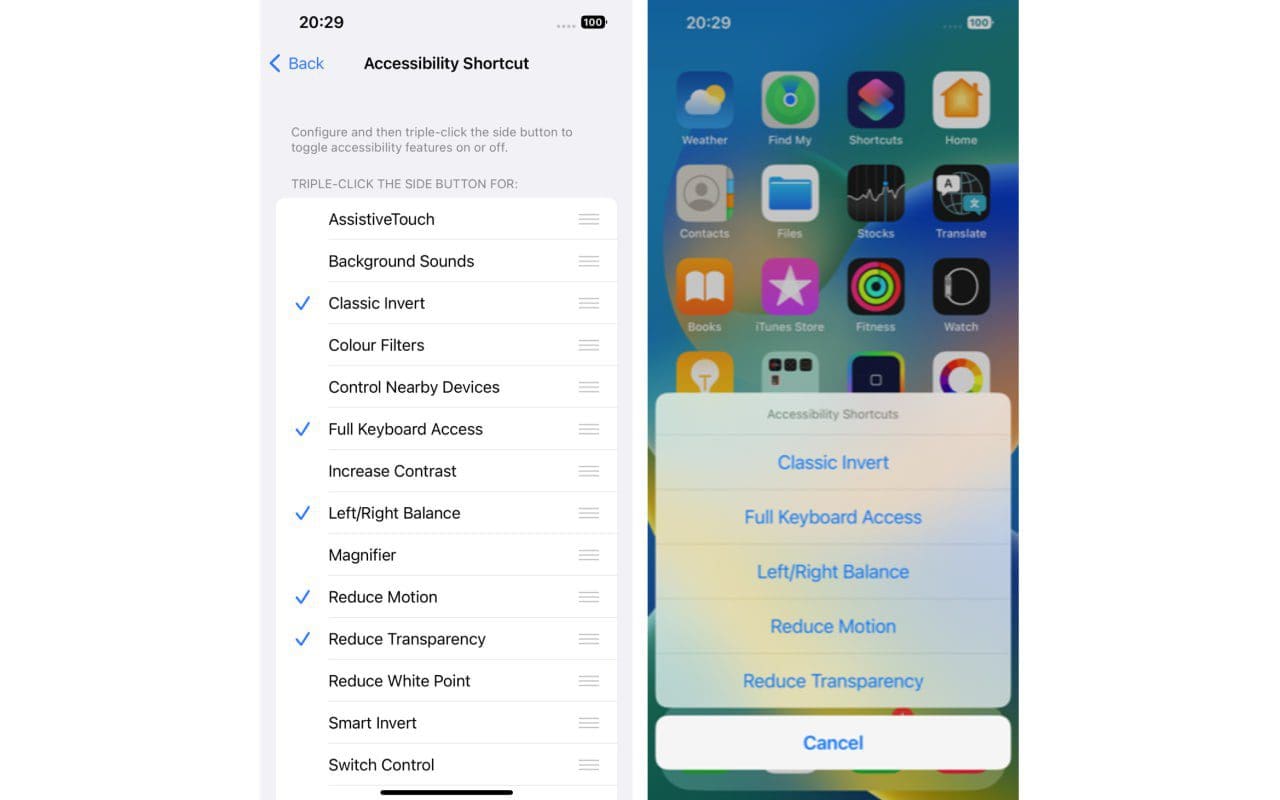
1. Accessibility Shortcut
In order to try things out on-the-fly, it can be helpful to configure an “Accessibility Shortcut” that you can activate by triple-clicking the side button. The option can be found at the very bottom of the Accessibility screen. Just tap on the various accessibility options to enable them on the shortcut menu. Then, you can triple-click the side button to turn on/off the various accessibility settings without having to constantly navigate into the Settings app:
2. VoiceOver
VoiceOver users include blind and low-vision users, as well as users with some cognitive or learning difficulties. To enable VoiceOver, navigate to Settings → Accessibility → VoiceOver
Pre-installed iOS screen reader. When enabled, VoiceOver reads everything on the screen. In mobile Safari, this includes all web content (text, alternatives for images, links, form fields, tables, and so on). In apps, this includes all buttons, images, form elements, static text, etc.
With VoiceOver — a gesture-based screen reader — you can use an iPhone even if you can’t see the screen. VoiceOver gives audible descriptions of what’s on your screen — from battery level, to who’s calling, to which app your finger is on. You can also adjust the speaking rate and pitch to suit your needs.
When you touch the screen or drag your finger over it, VoiceOver speaks the name of the item your finger is on, including icons and text. To interact with the item, such as a button or link, or to navigate to another item, use VoiceOver gestures.
When you go to a new screen, VoiceOver plays a sound, then selects and speaks the name of the first item on the screen (typically in the top-left corner). VoiceOver tells you when the display changes to the landscape or portrait orientation, when the screen becomes dimmed or locked, and what’s active on the Lock Screen when you wake your iPhone.
Keep the following points in mind when testing your app’s VoiceOver support:
- VoiceOver reads any text it can find: Tap everything to see what gets read and what doesn’t.
- VoiceOver changes how taps work: Single taps select an element and double taps perform an action. Scrolling is performed using a three-finger drag gesture.
- VoiceOver reads subviews in order from front to back: That is, subviews higher in the view hierarchy (i.e. ones at the bottom of the list in Interface Builder) get read first. Make sure the order that things are being read makes sense and adjust subview ordering accordingly.
- VoiceOver might read things differently than you would expect: VoiceOver uses spacing, line breaks, capitalization, and punctuation to try to say things the way they’re intended, but it won’t always get you the result you want. Adjust accessibility labels accordingly.
Explore your app with the following gestures with one, two, and three fingers:
- Tap
- Double-tap
- Triple tap
- Swipe left, right, up, or down
You may get an alert that VoiceOver changes the gestures used to control the device. Select OK. Once you enable VoiceOver, the way you interact with the device changes. There are two interaction methods:
- Explore by touch: Drag your finger over the screen to have VoiceOver describe the items under your finger. You can tap with a second finger or double-tap to open links, press buttons, and so on.
- Gesture navigation: You can swipe right with a single finger to move from one item to the next in sequence. You can swipe left to go backward through this sequence. The voiceOver describes items as you move focus around the screen. You can double-tap to open links, press buttons, and navigate using the Rotor.
You can temporarily mute VoiceOver by double-tapping the screen with three fingers.
3. Zoom
People with low vision often use Zoom. Users with cognitive impairments, such as autism, may also use Zoom to focus on key content and reduce the amount of visual clutter on the screen. To enable full-screen Zoom, first, navigate to the Zoom screen and select Settings → Accessibility → Zoom.
In many apps, you can zoom in or out on specific items. For example, you can double-tap or pinch to look closer in Photos or expand web page columns in Safari. You can also use the Zoom feature to magnify the screen no matter what you’re doing. You can magnify the entire screen (Full-Screen Zoom) or magnify only part of the screen with a resizable lens (Window Zoom). And, you can use Zoom together with VoiceOver.
4. AssistiveTouch
AssistiveTouch helps you use an iPhone if you have difficulty touching the screen or pressing the buttons. You can use AssistiveTouch without any accessory to perform actions or gestures that are difficult for you. You can also use a compatible adaptive accessory (such as a joystick) together with AssistiveTouch to control your iPhone.
With AssistiveTouch, you can use a simple tap (or the equivalent on your accessory) to perform actions such as the following:
- Open the AssistiveTouch menu
- Go to the Home Screen
- Double-tap
- Perform multi-finger gestures
- Perform scroll gestures
- and much more
Analysis tools
Testing accessibility is a very manual and time-consuming process. However, Apple has some tools to make testing and debugging accessibility issues easier.
1. The Accessibility Inspector
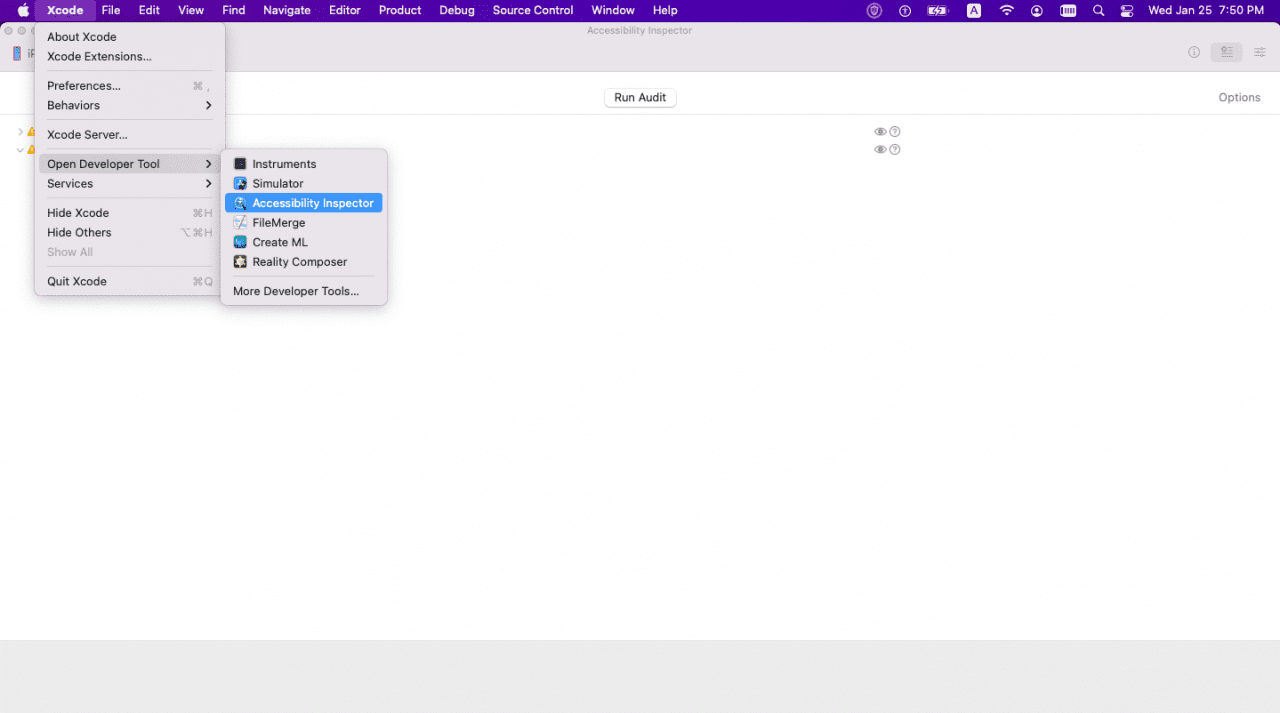
The Accessibility Inspector in Xcode can be used to test for missing or incorrect labels, traits, and hints amongst other things. This can be run in the developer environment or using the iOS simulator. The Accessibility Inspector displays accessibility information about each accessible element in an app. You can use the Accessibility Inspector to simulate VoiceOver interaction with the accessible elements in your app to examine the information they provide. Accessibility Inspector tool can be launched by choosing Xcode > Open Developer Tool > Accessibility Inspector in the menu bar.
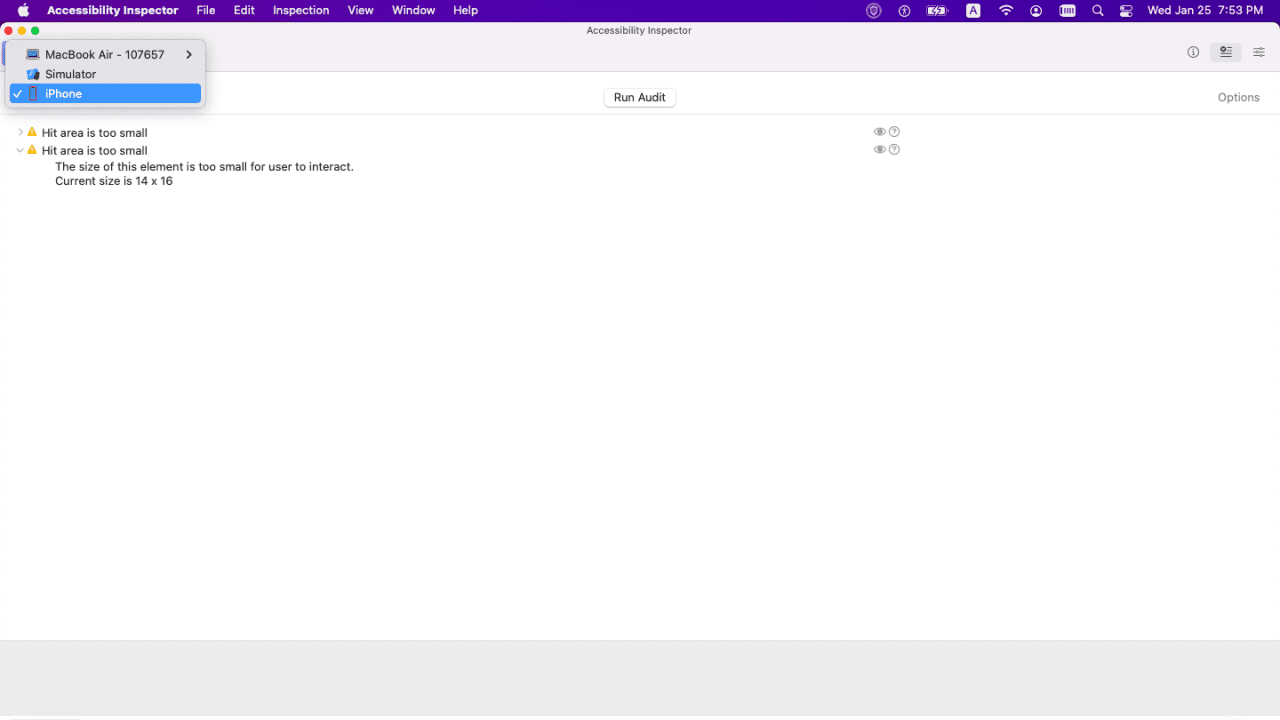
In order to use the Accessibility Inspector to check your app, you’ll have to connect your device to your MacBook or launch your app in a simulator. Once it’s connected, it will show as an option in the device dropdown.
Once you’ve chosen the device or simulator, the Accessibility Inspector will show all of the basic settings, actions, element details, and UI element hierarchy. For the purposes of accessibility, we’re going to focus on the “Basic” section. In here, you can see the values set for the accessibilityLabel, accessibilityValue, accessibilityTraits, and the accessibilityIdentifier. By pressing the “Audio” button, you can also hear the label read aloud. Keep in mind that this isn’t always exactly what VoiceOver speaks on a device! For one thing, it does not voice or show the accessibilityHint.
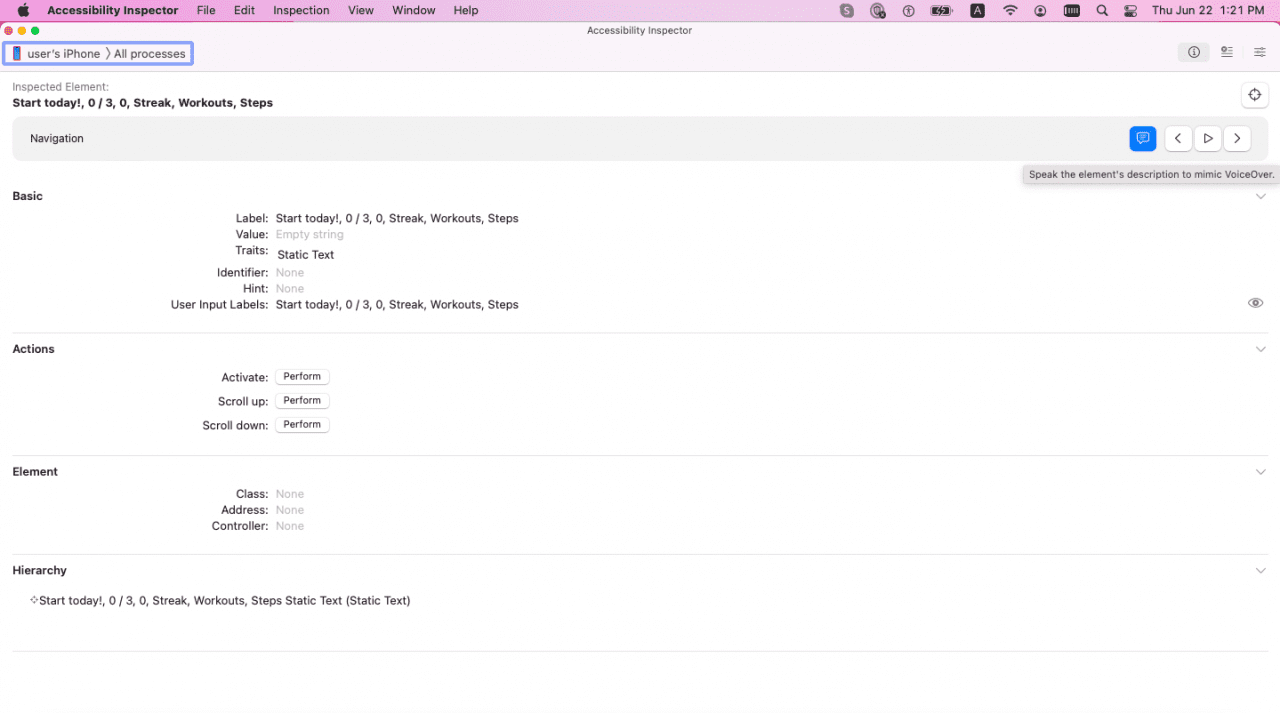
There are multiple options available for navigating through the focusable elements in your app:
- Enable the Inspection Pointer which allows you to hover over simulator elements.
- Use the Next/Previous element buttons to manually move through elements in focus order.
- Press the Play button to automatically move through elements as VoiceOver finishes voicing each one.
- You also have the option to navigate through the elements without any audio by toggling the audio button off.
By going through your app with the Accessibility Inspector, you can verify accessibility settings and perform a more in-depth audit of what is missing.
The Accessibility Inspector also has an audit feature. This goes through all of the UI elements on the screen and lets you know which ones may be inaccessible with VoiceOver. It also lets you know which elements don’t support Dynamic Text.
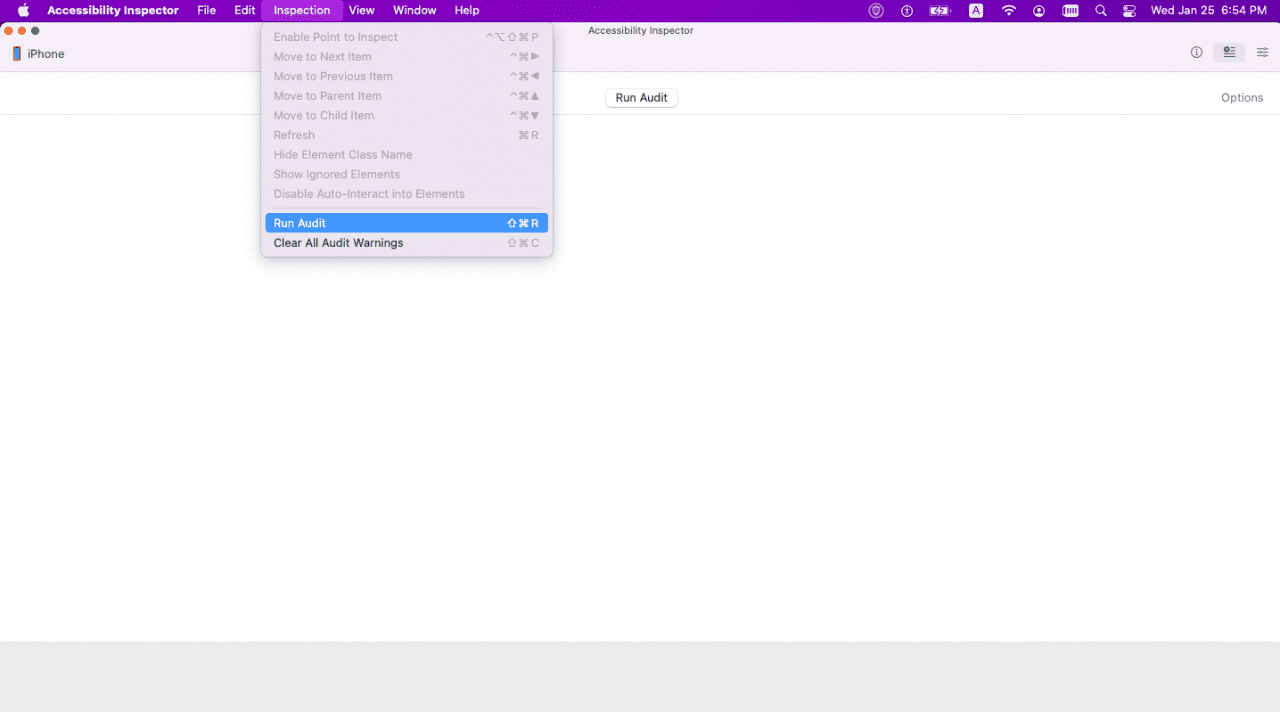
The Audit goes through all of the UI elements on the screen and lets you know which ones may be inaccessible with VoiceOver. It also lets you know which elements don’t support Dynamic Text.


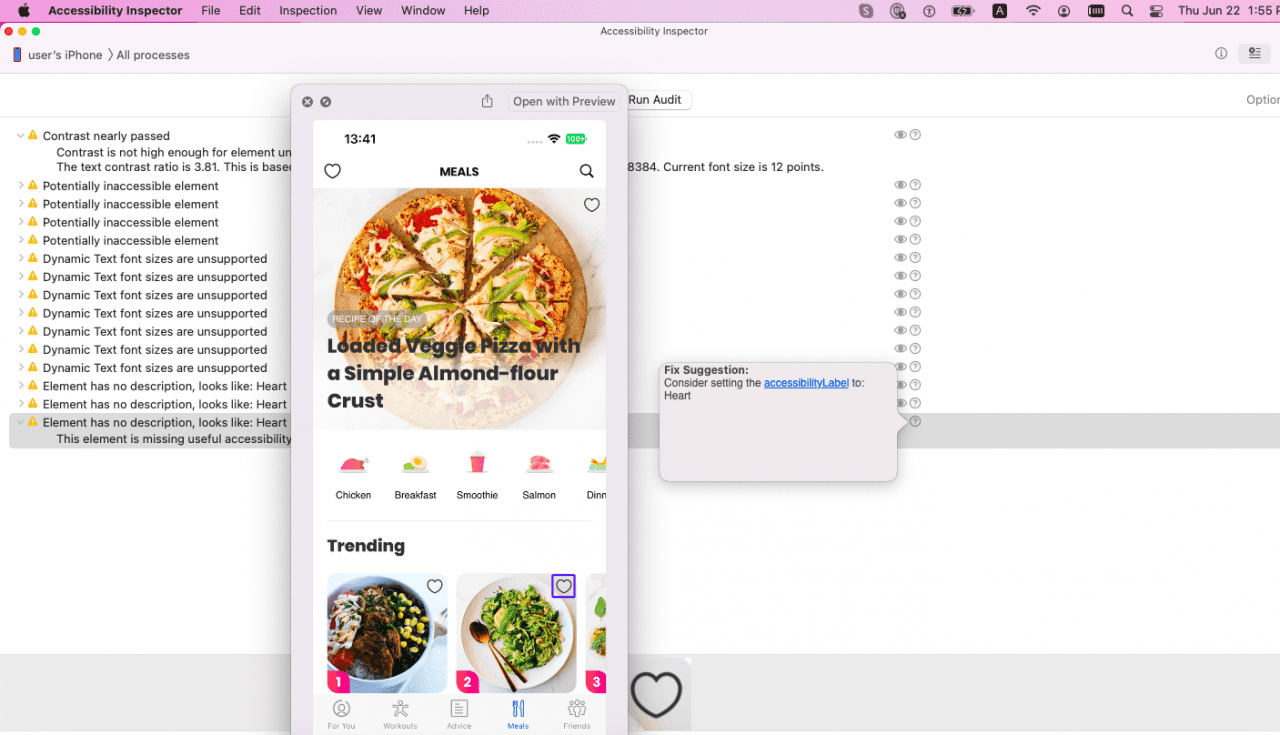
Simply switching to the audit screen and pressing “Run Audit” gives you a list of issues to fix. Above, you can see that the screen audited is missing accessibility settings on multiple UI elements, and its labels don’t allow for dynamic sizing. The eye button next to each item will show you which UI element the warning is referring to. There is also a button with a question mark in a circle next to it that which provides suggestions on how to fix the issue.
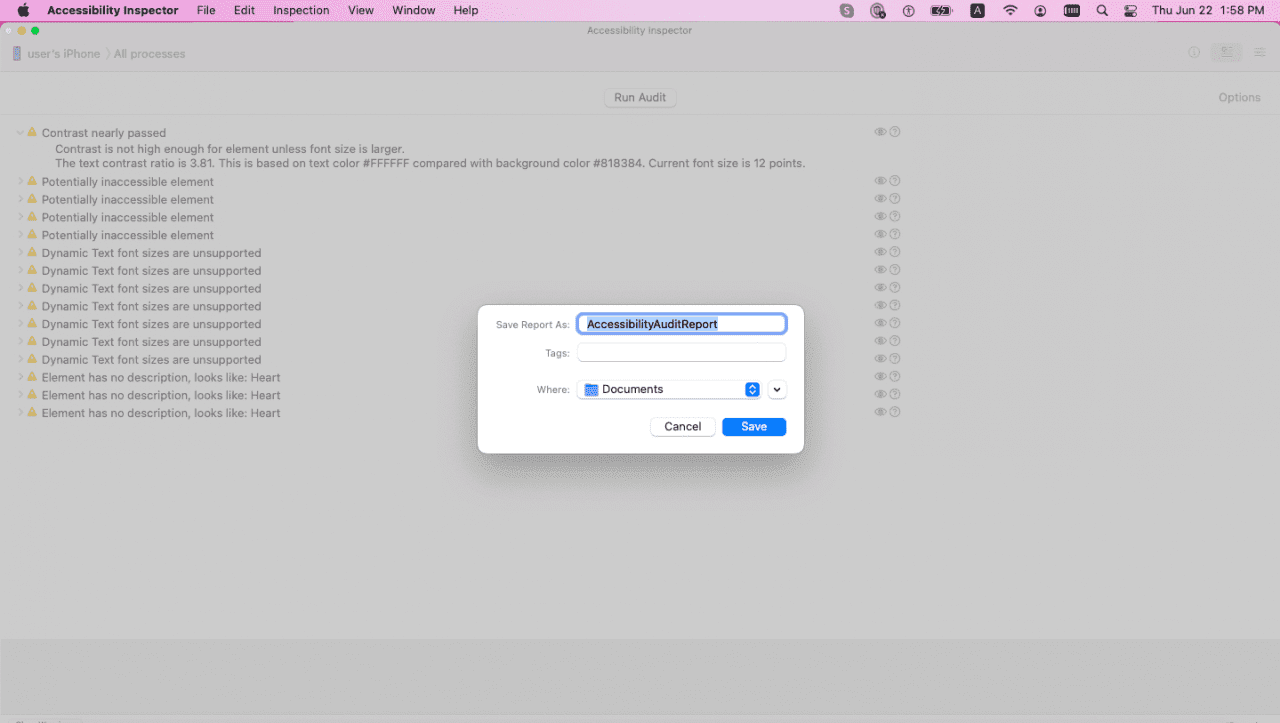
You can save the Accessibility Audit report as a file:
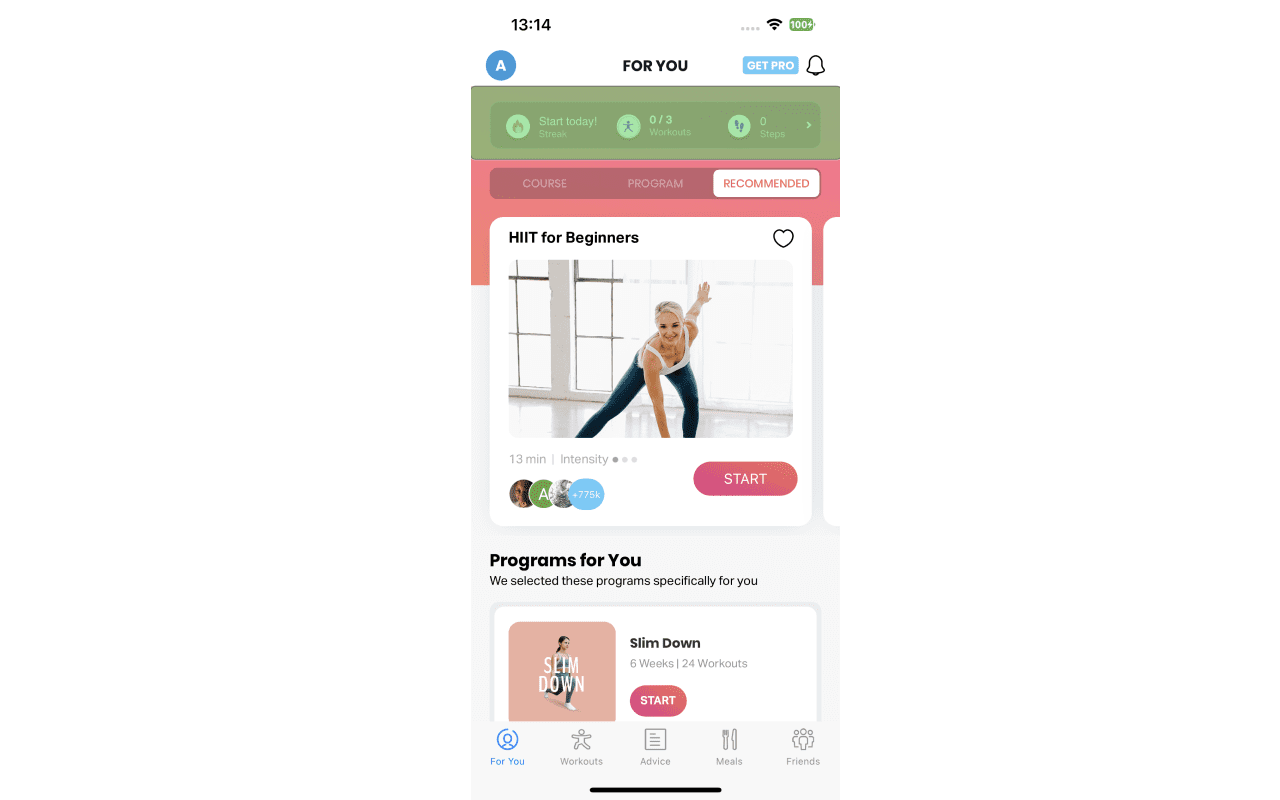
Accessibility Inspector settings allow you to make real-time adjustments to your app to test accessibility. For example, if you enable Dynamic Text on a label, using the font size slider will change the size of text on the simulator immediately.

This can help to improve the mobile accessibility of the app in a timely manner.
The Bottom Line
We hope this mobile accessibility testing article helped you understand the key components of mobile accessibility testing, such as the goals of testing, necessary testing procedures, the most common testing tools, and unique considerations to build a mobile app with all the necessary accessibility features. Apart from enabling the mobile app to be accessible to people with disabilities, this type of testing will also enhance the overall user experience of all users.
At MobiDev, we leverage various tools to perform mobile accessibility testing for apps to offer a top-north user experience for all groups of users. With these tools, the Mobidev team can keep web projects in line with existing web accessibility requirements, ensuring zero critical or major issues. Whether you need to design a mobile project from scratch or just ensure its mobile accessibility before release, feel free to check out our quality assurance services and drop us a line — the MobiDev experts will be backing you up and directing your path.


