

Hello again! It’s time to continue the making of Pluto the Robot. Since the events described in Part I and Part II, our Pluto has become able to receive commands, move forward, backward, to the left and to the right.
As of now, Pluto is not a long distance runner because of the USB cord that connects it to the computer. Well, the time has come to set him free: we are going to attach a Raspberry Pi with a Wi-Fi module and connect it to a Python-based web server.
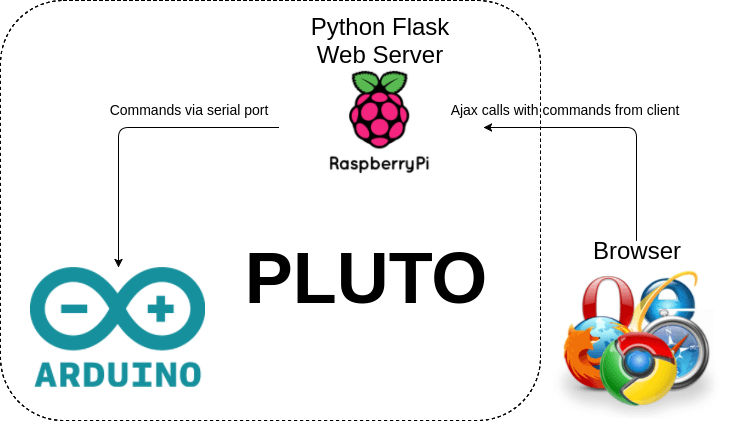
This is the general scheme that shows how the robot works. The idea is that the browser processes the user’s actions and sends AJAX requests to the Flask web server, which is set up on our Raspberry Pi. Then the server sends these commands to the Arduino.
I use a new Raspberry Pi 3, and I suggest starting with installation of Raspbian OS on a flash card. We will need a monitor with an HDMI port, a USB keyboard and a mouse. Further on, we are going to connect to the Raspberry via SSH and VNC. Therefore, all we need to do is to power the Raspberry, and control it via a computer.
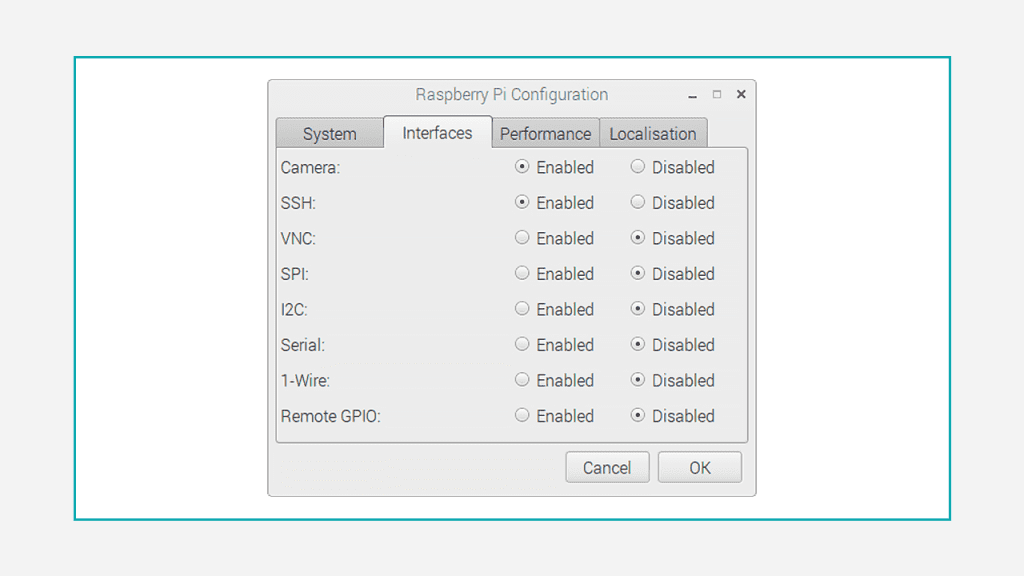
After the installation of the OS on our Raspberry, we can connect to a Wi-Fi network and turn on the following interfaces in system settings: Camera, SSH and VNC.
Now let’s reboot the Raspberry. We want to get rid of the monitor, the mouse and the keyboard, and establish remote connection with the Raspberry. For that purpose, we need to know its IP address by executing the following command in the terminal:
ifconfig
The IP address will be indicated in the section wlan0. Now we can put our monitor, mouse and keyboard back on the shelf. We turn on the computer and write down an SSH connection command in the terminal:
ssh pi@192.168.20.10
The IP address of your Raspberry Pi will naturally be different. For the user “pi”, the default password is “raspberry”. Then we launch the VNC server:
vncserver
Now let’s set up and launch the VNC viewer on the computer. You may download it from here. We launch the VNC viewer and connect to the VNC server of the Raspberry according to the address returned by the “vncserver” command. The user is “pi”, the password is “raspberry”. After the successful connection, we can see the home screen of our Raspberry.
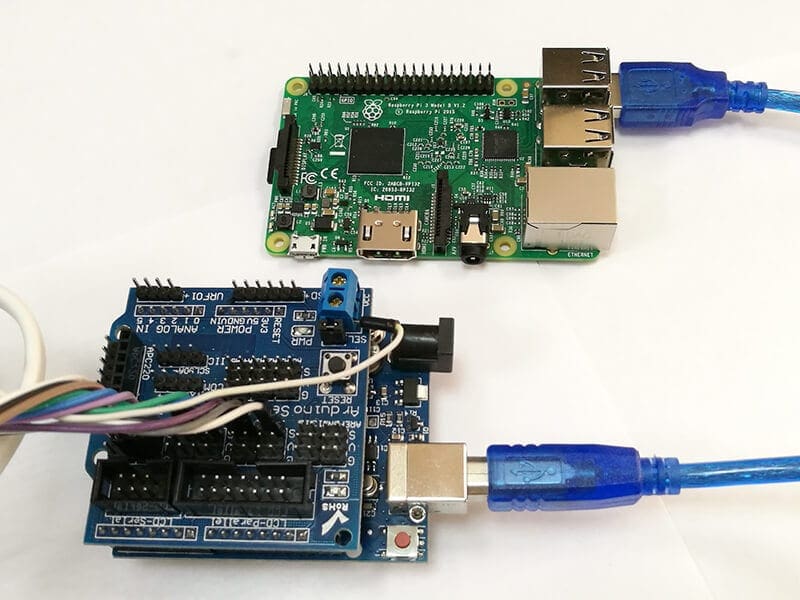
To make things simpler, I decided to organize interaction between the Arduino and Raspberry Pi via Serial Port, providing the Arduino with power for good measure.
In order to test the interaction between two boards, let’s write a simple script in Python. We create a file test.py with the following content:
import serial
import time
ser = serial.Serial('/dev/ttyUSB0', 9600)
time.sleep(5)
print('Go Forward')
ser.write('1,0,80,80')
time.sleep(5)
print('Go backward')
ser.write('1,1,80,80')
time.sleep(5)
print('Stop')
ser.write('0')
Then we launch the script as follows:
python test.py
The robot will rotate the wheels forward for 5 seconds, then back for 5 seconds, then it will stop.
That said, our proof of concept works (and I hope it will for you). Let us start developing a web application based on Flask. First let’s create the main file of the application, app.py:
from flask import Flask, render_template, request, Response
import serial, time
app = Flask(__name__)
state_msg = 'Hello, Telerobot is ready to operate, have fun!'
try:
    ser = serial.Serial('/dev/ttyUSB0', 9600)
except serial.serialutil.SerialException:
state_msg = 'Telerobot is disconnected
(please connect Arduino to Raspberry Pi)'

@app.route('/')
def index():
return render_template('index.html', state_msg=state_msg)

@app.route('/move/')
def move(direction):
    if direction == 'forward':
        ser.write('1,0')
    if direction == 'backward':
        ser.write('1,1')
    if direction == 'left':
        ser.write('1,3')
    if direction == 'right':
        ser.write('1,2')
    return '{}'

@app.route('/set_speed/')
def set_speed(speed):
    ser.write('2,' + speed)
    return '{}'

@app.route('/stop')
def stop():
    ser.write('0')
    return '{}'
if __name__ == '__main__':
    app.run(debug=True, host='0.0.0.0')
In other words, this web server receives requests according to the addresses indicated with the method @app.route and processes them with the methods below. For example, a query http://your_robot_ip:5000/move/forward calls a server method move(direction), which sends a command ‘1,0’ through Serial Port to the Arduino.
The robot control panel will be available at http://your_robot_ip:5000/; this address is processed by the method index. This method reads the file index.html from the directory templates/ and returns its content to the client (the browser). Now let’s proceed to development of the index.html page. The code for this page may roughly look like this:
<html lang="en">
  <head>
    <meta charset="utf-8">
    <meta http-equiv="X-UA-Compatible" content="IE=edge">
    <meta name="viewport" content="width=device-width, initial-scale=1">
    <title>Pluto the Robot</<!--title>
    <script src="https://code.jquery.com/jquery-3.1.1.min.js"
integrity="sha256-hVVnYaiADRTO2PzUGmuLJr8BLUSjGIZsDYGmIJLv2b8="
crossorigin="anonymous"></<!--script>
  <<!--head>
  <body>
    <h1>{{ state_msg }}<!--h1>
    Set speed:<br /><br />
    <input type="range" max="150" value="100" step="10" min="100"
id="set-speed">
<br />
<button type="button" class="btn btn-default" id="move-left"> < <!--</<!--button>
<button type="button" class="btn btn-default" id="move-forward"> ^ <!--</<!--button>
<button type="button" class="btn btn-default" id="move-backward"> v <!--</<!--button>
<button type="button" class="btn btn-default" id="move-right"> > <!--</<!--button>
<button type="button" class="btn btn-danger" id="stop">Stop</<!--button>
<script>
 $('#stop').on('click', function(){
    $.get('/stop');
  });
 $('#move-forward').on('click', function(){
    $.get('/move/forward');
  });
 $('#move-backward').on('click', function(){
    $.get('/move/backward');
  });
 $('#move-left').on('click', function(){
    $.get('/move/left');
  });
 $('#move-right').on('click', function(){
    $.get('/move/right');
  });
 $("set-speed").on('change', function(){
    $.get('/set_speed/' + this.value);
  });
<!--</script>
  </<!--body>
<!--</html>
On the robot control page we’ve placed 5 control buttons (“move-left”, “move-forward”, “move-backward”, “move-right”, and “stop”) and an input field “set-speed”. Pressed controls are processed by JavaScript, which sends AJAX requests to the web server under the control of Raspberry Pi.
We save all edited files. To launch the server, we execute the command python app.py. Flask will launch on port 5000. To enter the control page, we enter http://YOUR_RASPBERRY_PI_IP:5000 in the browser.
It is very inconvenient to launch the server manually each time we power the robot. That’s why I suggest we add it to autolaunch. To do so, we write the following code at the end of the file /etc/profile:
sudo python /home/pi/pluto-wifi-robot/raspberry_pi/web/app.py &
The path to the app.py may differ for your Raspberry. Don’t forget to add & at the end, because it allows to launch the web server in the background, which does not block the execution of other scripts.
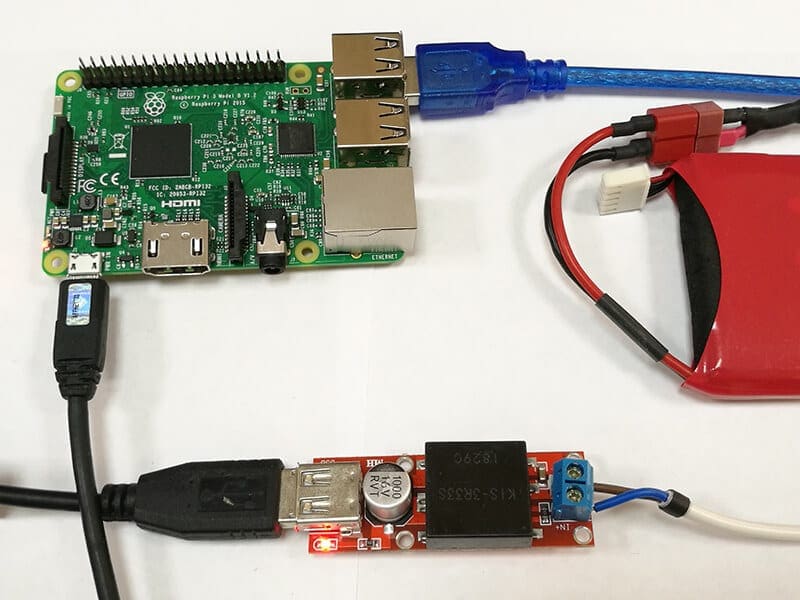
Pluto is almost ready for its first controlled launch. We only have to detach it from the computer and power it with a battery through the microUSB of Raspberry Pi. Since I had a 12V battery, while USB requires 5V, I bought a DC-DC converter and used it to connect the battery.
You have probably noticed that all the hardware and batteries of Pluto are definitely too much for one platform. I solved this problem by adding a second level, where I attached the Arduino, Raspberry Pi and the DC-DC converter, while the motor driver and the batteries were left on the first level.
You can find the working code here.
That’s it! I will soon conclude this story with the fourth part, where I’ll tell how to attach a camera to Raspberry Pi and implement a real-time video streaming to the browser.
Here is the full series of articles about Pluto:


